Building a Home Climbing Wall
Disclaimer: I am not a structural engineer! This is a writeup on what I built based on other people’s walls and lot of youtube videos. The structure seems sound and solid, but there is definitely no proper physic theory applied.
TL;DR
A lot of home wall writeups and youtube went into the final making of mine, but if there are two that were mostly used as base for my model, they are probably this one and that one.
Note: I provide some diagram with measurements…. but most of the actual measurement calculations were made on some scratch pad while building the wall….. I have drawn cleaner design on paper after having built the wall, and reported measurements based on what is built, so those numbers may be slightly off… I would recommend that you use them as a reference, but probably don’t go crazy and cut your lumber based on those numbers. Do doublecheck before you cut too short :D.
Requirements
When I built this wall, I wanted it to be:
- Freestanding: my garage has a lot of storage along the walls which I did not want to rip out, I was not confident in using the ceiling beams to attached to and did not want to call a structural engineer to validate they would be OK.
- Indoor: being indoor, I did not bother treating the wood or using weather-proof screws.
- Kickboard: I was not sure if there were going to be enough clearance between the top of the wall and the garage door opener, the structure seemed more complex to do (based on my limited knowledge), and after much analysis paralysis, I decided to do without and get moving forward.
Bill of Materials
This is exactly what was used to build the wall:
| Quantity | Product | Purpose |
|---|---|---|
| 10 | 2x6x10 lumber | 1x top plate, 7x studs, 2x support diagonal) |
| 6 | 2x6x8 lumber | 1x bottom plate, 1x top panel’s top plate, 4x supports |
| 3 | 23/32 4x8 plywood sheets | 2x main wall, 1x side panels |
| 1 | 1/2 2x4 plywood sheets | top panel |
| 1 | 1/2 2x4 plywood sheet | top panel |
| 10 | joist hanger | internal studs |
| 6 | mending plate | each sides/each joint of the side supports |
| 1 | #10 3” flat-head wood screw | attaching lumber together |
| 2 | #8 2” flat-head wood screw | screwing plywood to lumber |
| 1 | #8 1-1/4” flat-head wood screw | screwing mending plate to lumber |
| 4 | 3/8”-16x5 hex bolt | attaching frame to the side supports |
| 4 | 3/8”-16 hex nut | |
| 8 | 3/8” Flat washer | |
| 4 | 3/8”-16 T-Nuts 100-pack |
Tools
You may already have them home, but here are useful tools to have:
- rafter square
- carpenter square
- Hammer
- Drill
- 3/8 and 7/16 Spade bits
- Drill Guide
- Chalk Line
- Tape measure
- Miter saw
- Clamps
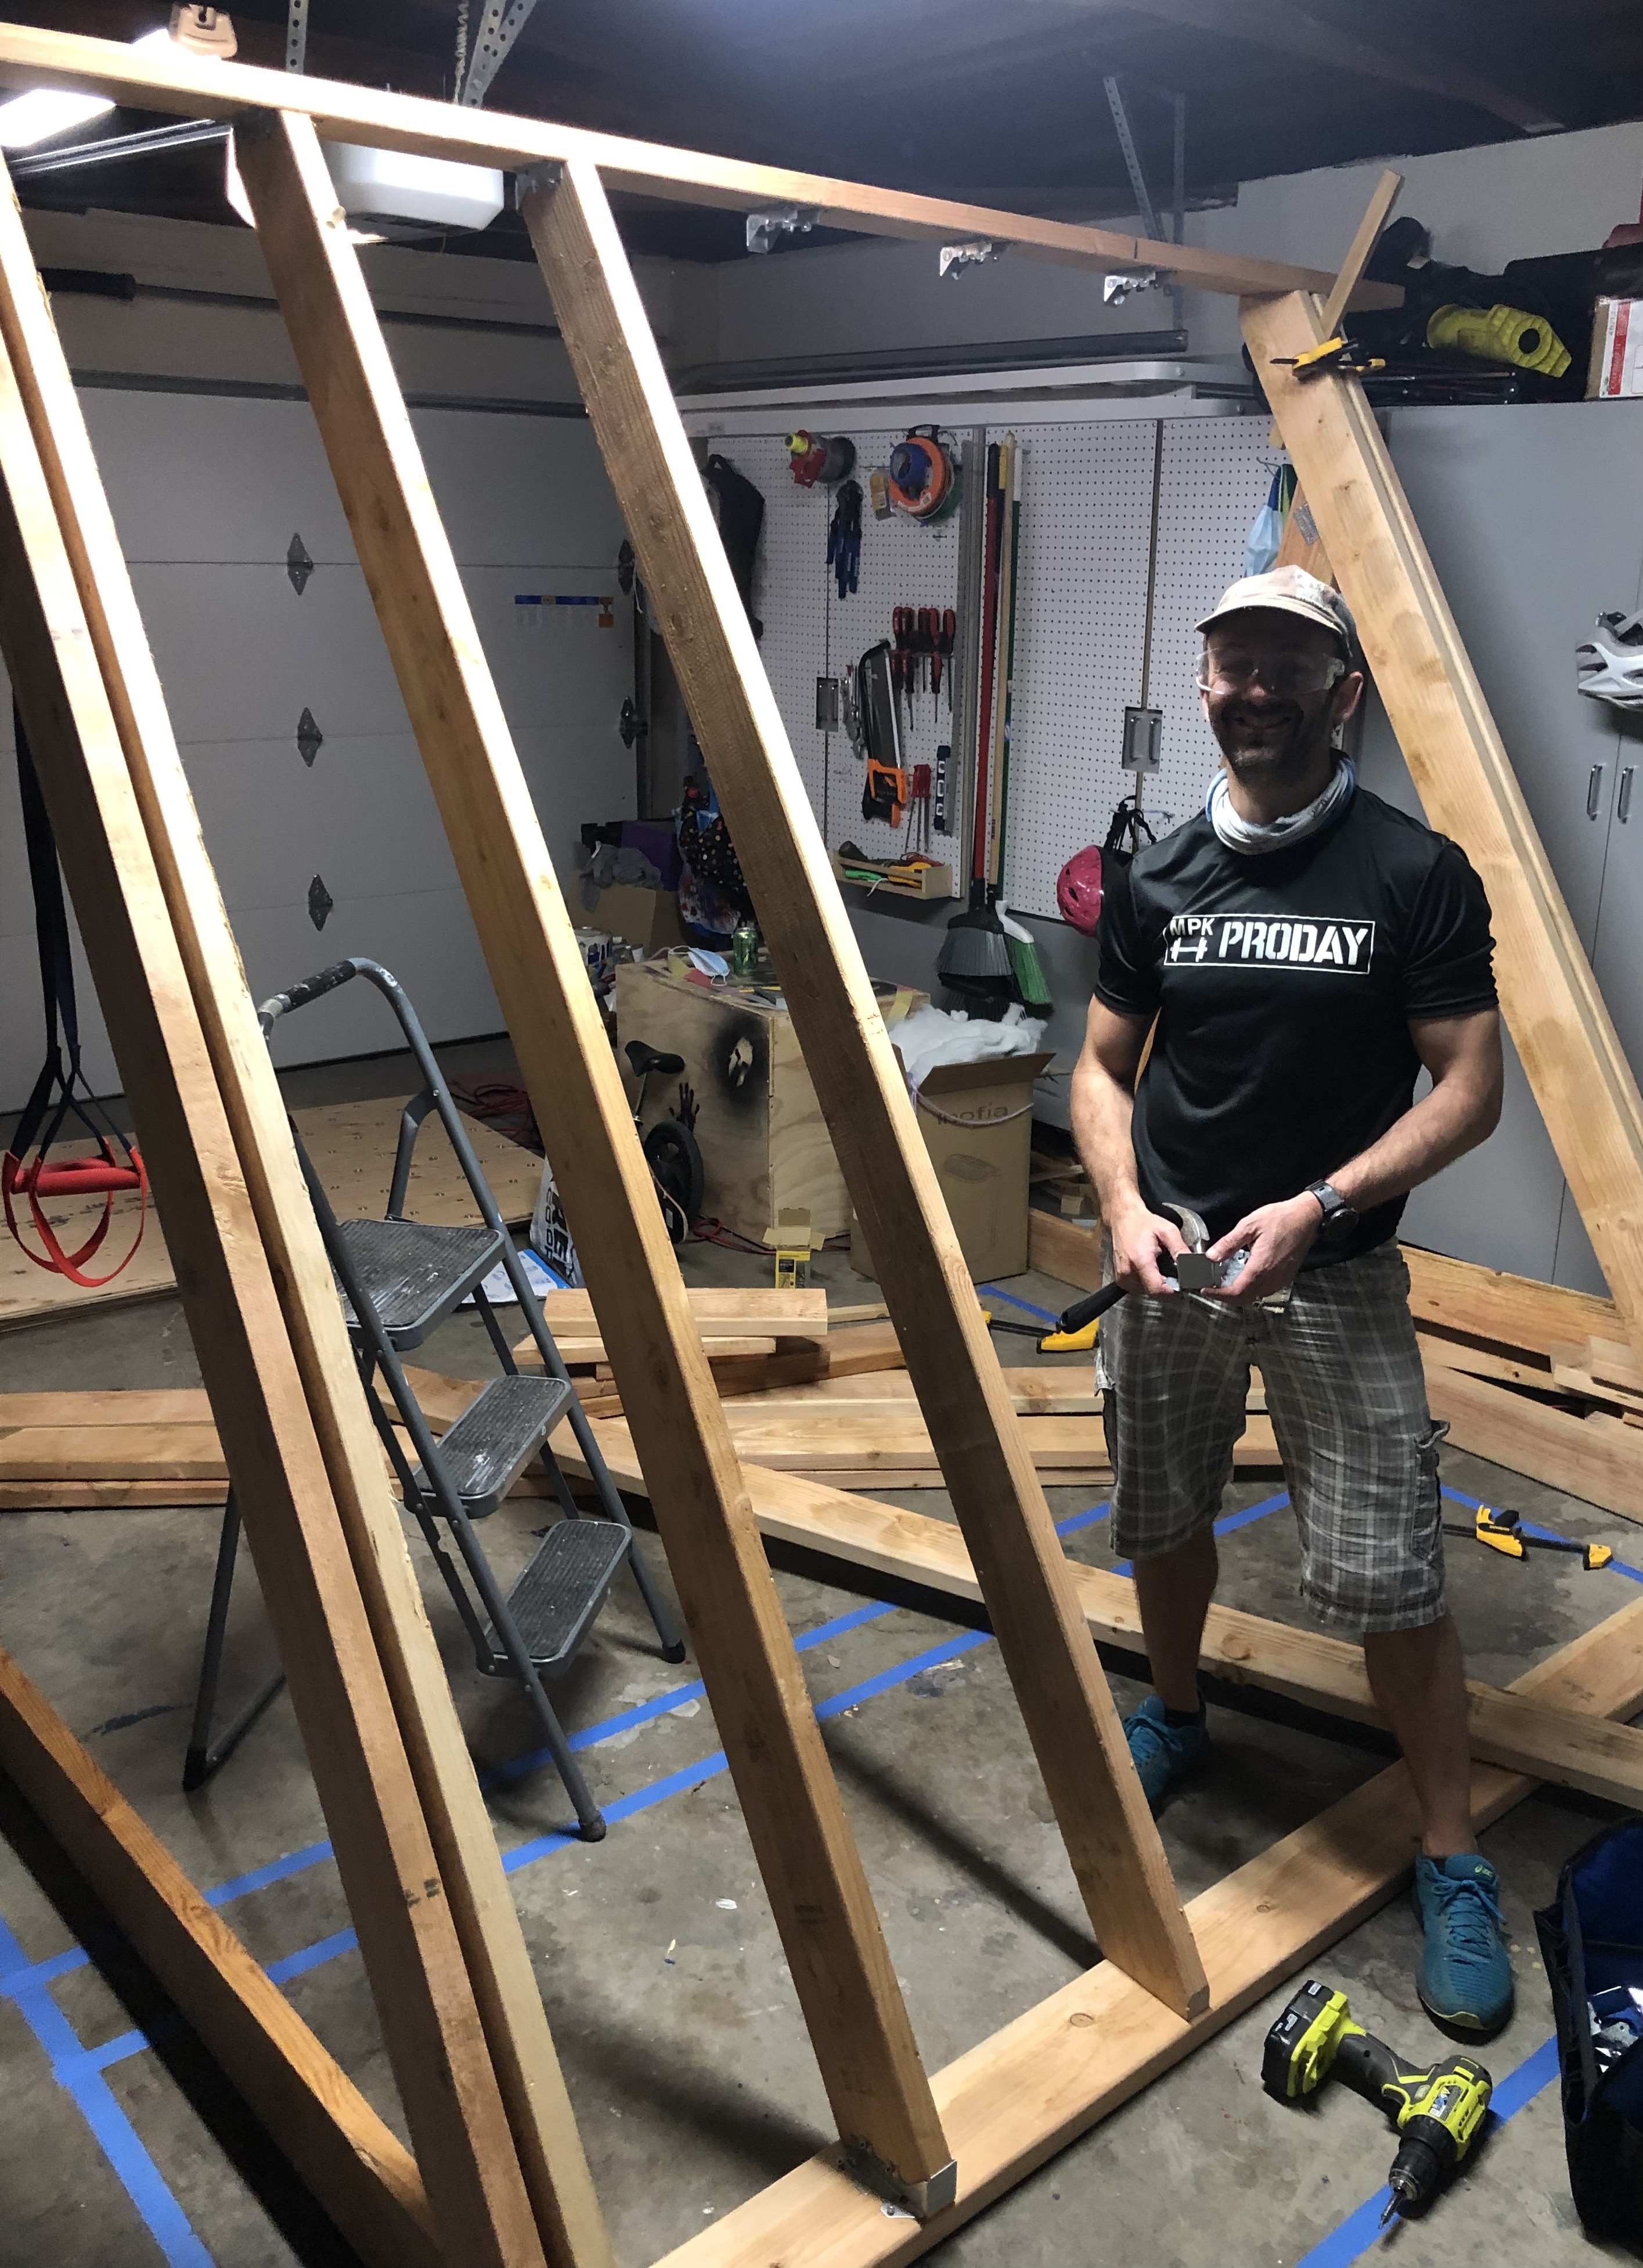
Building it up
I started by building the side supports and assembling them, then the main wall framework. Once those two pieces were done, I assembled the frame and supports together. Next was to add the blocking to the frame and mount the plywood on the wall.
Finally, building the top panel and attaching the side panels.
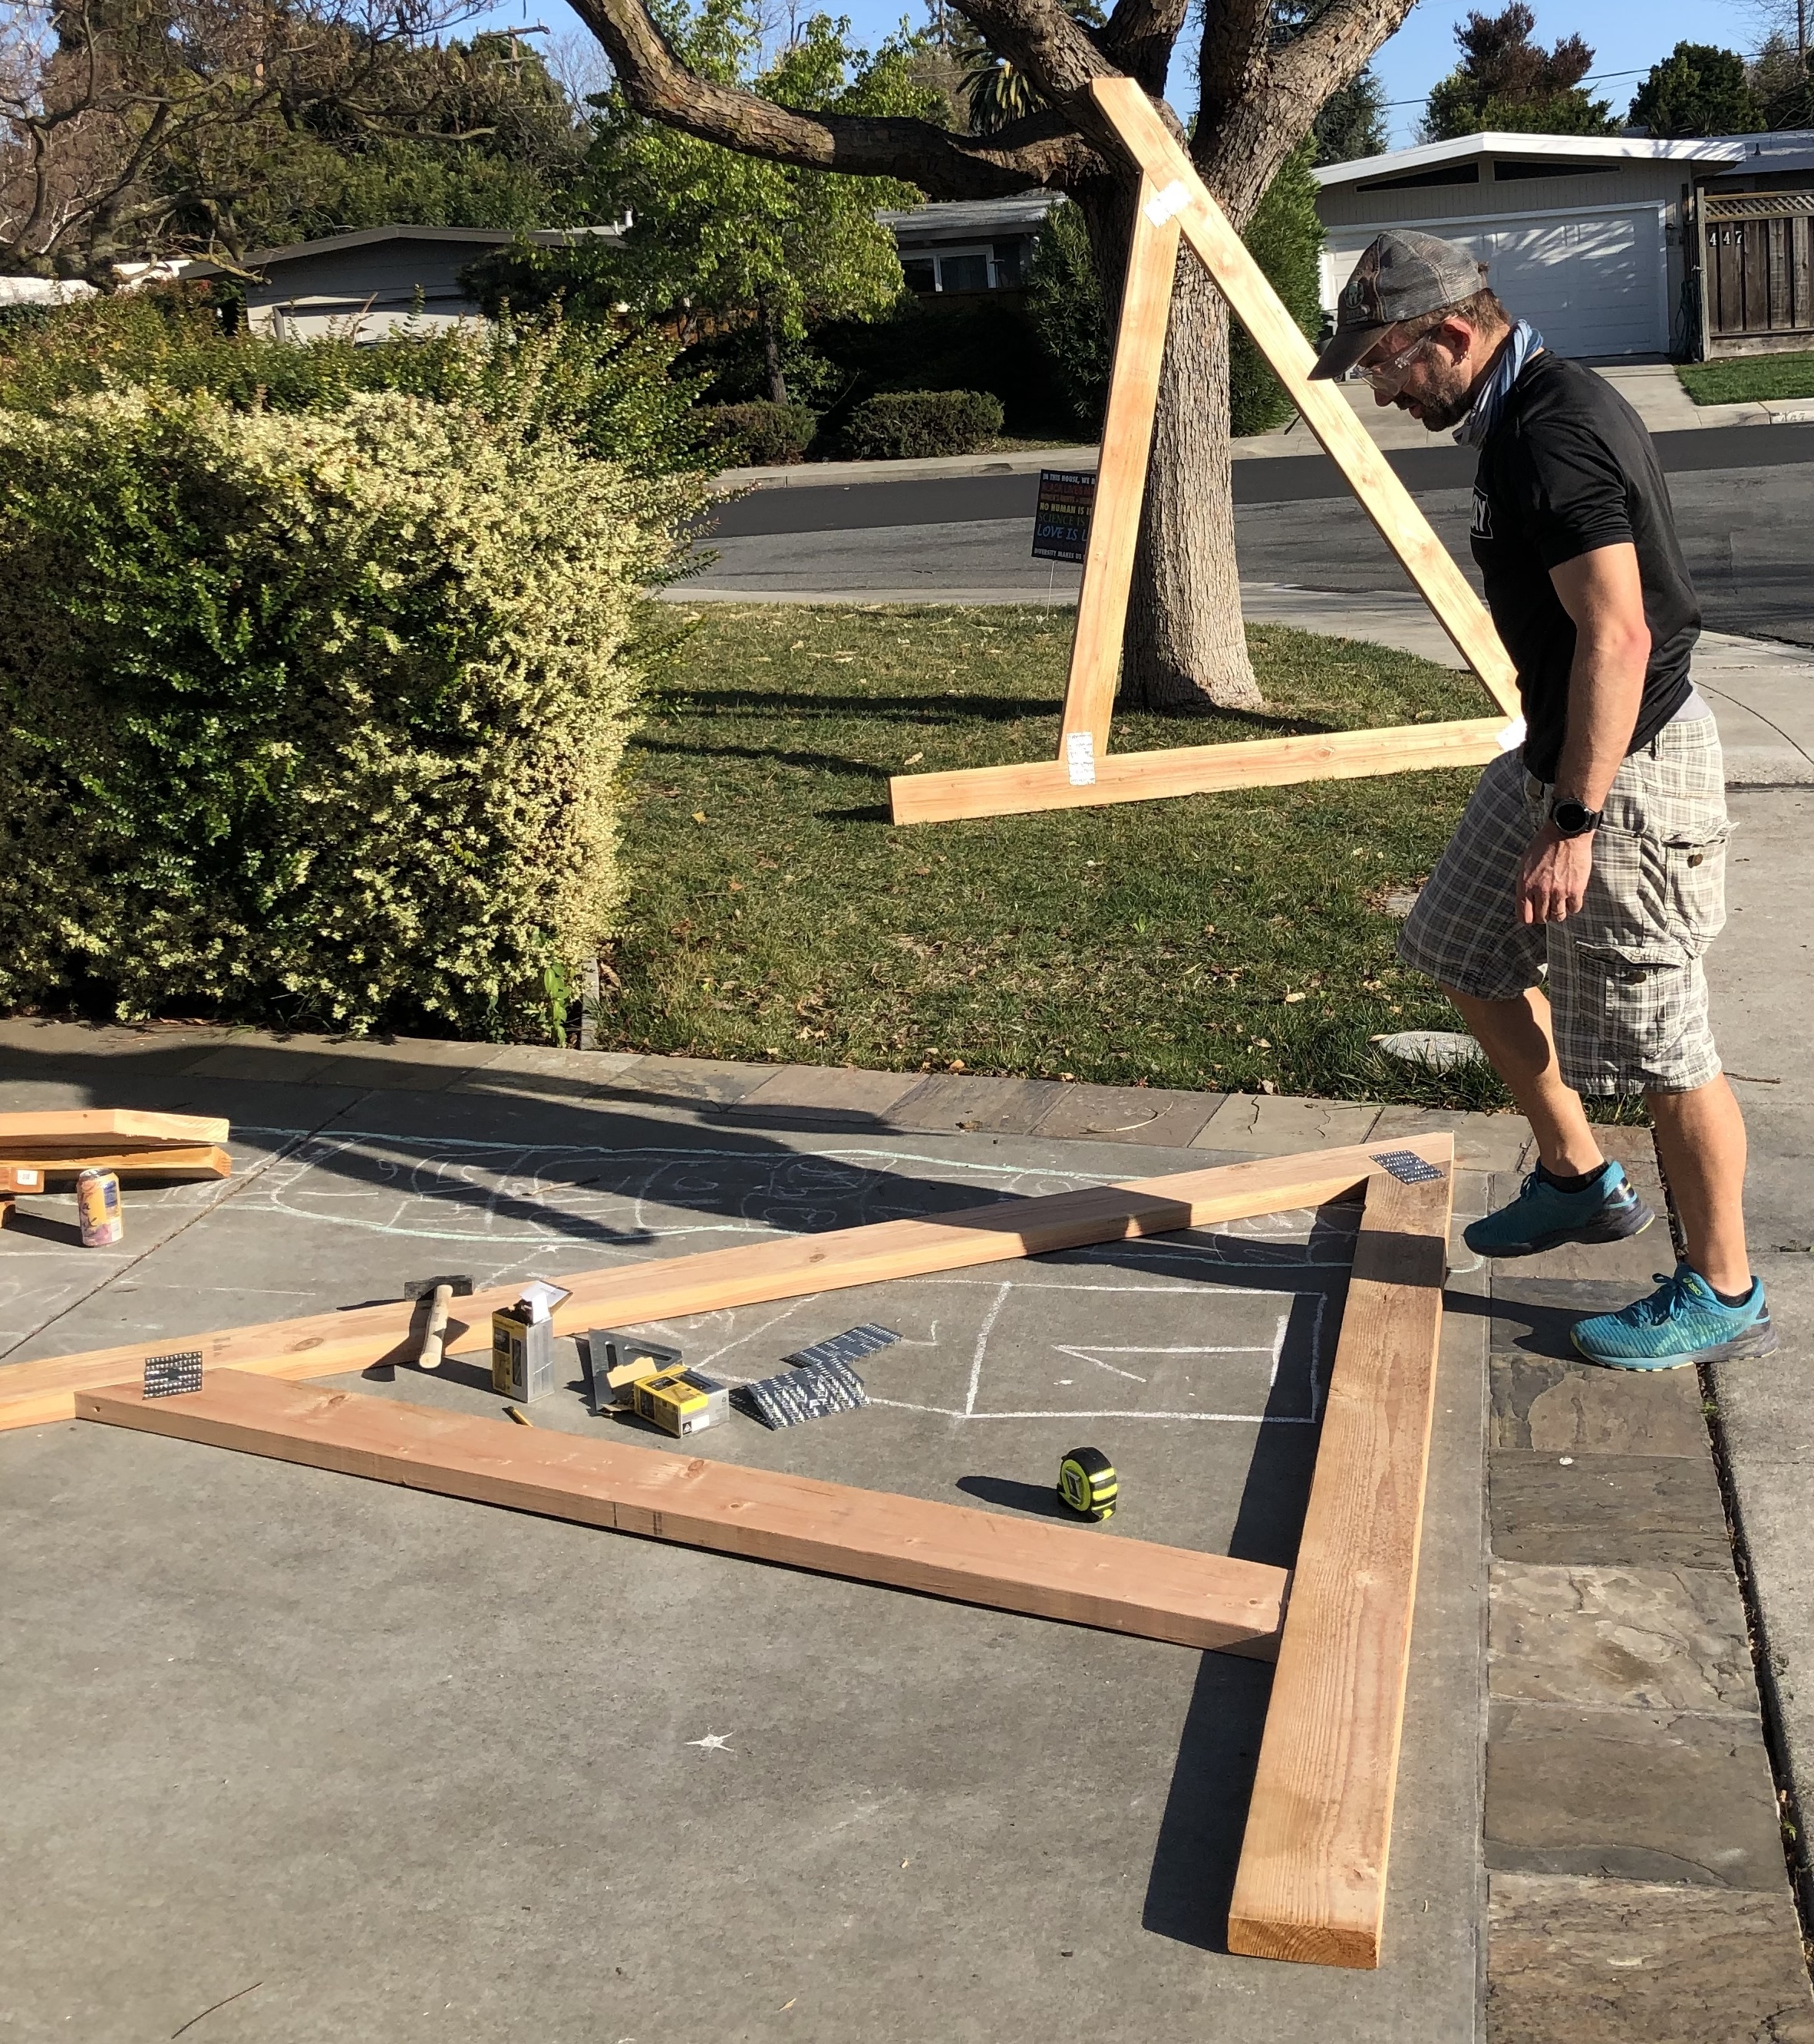
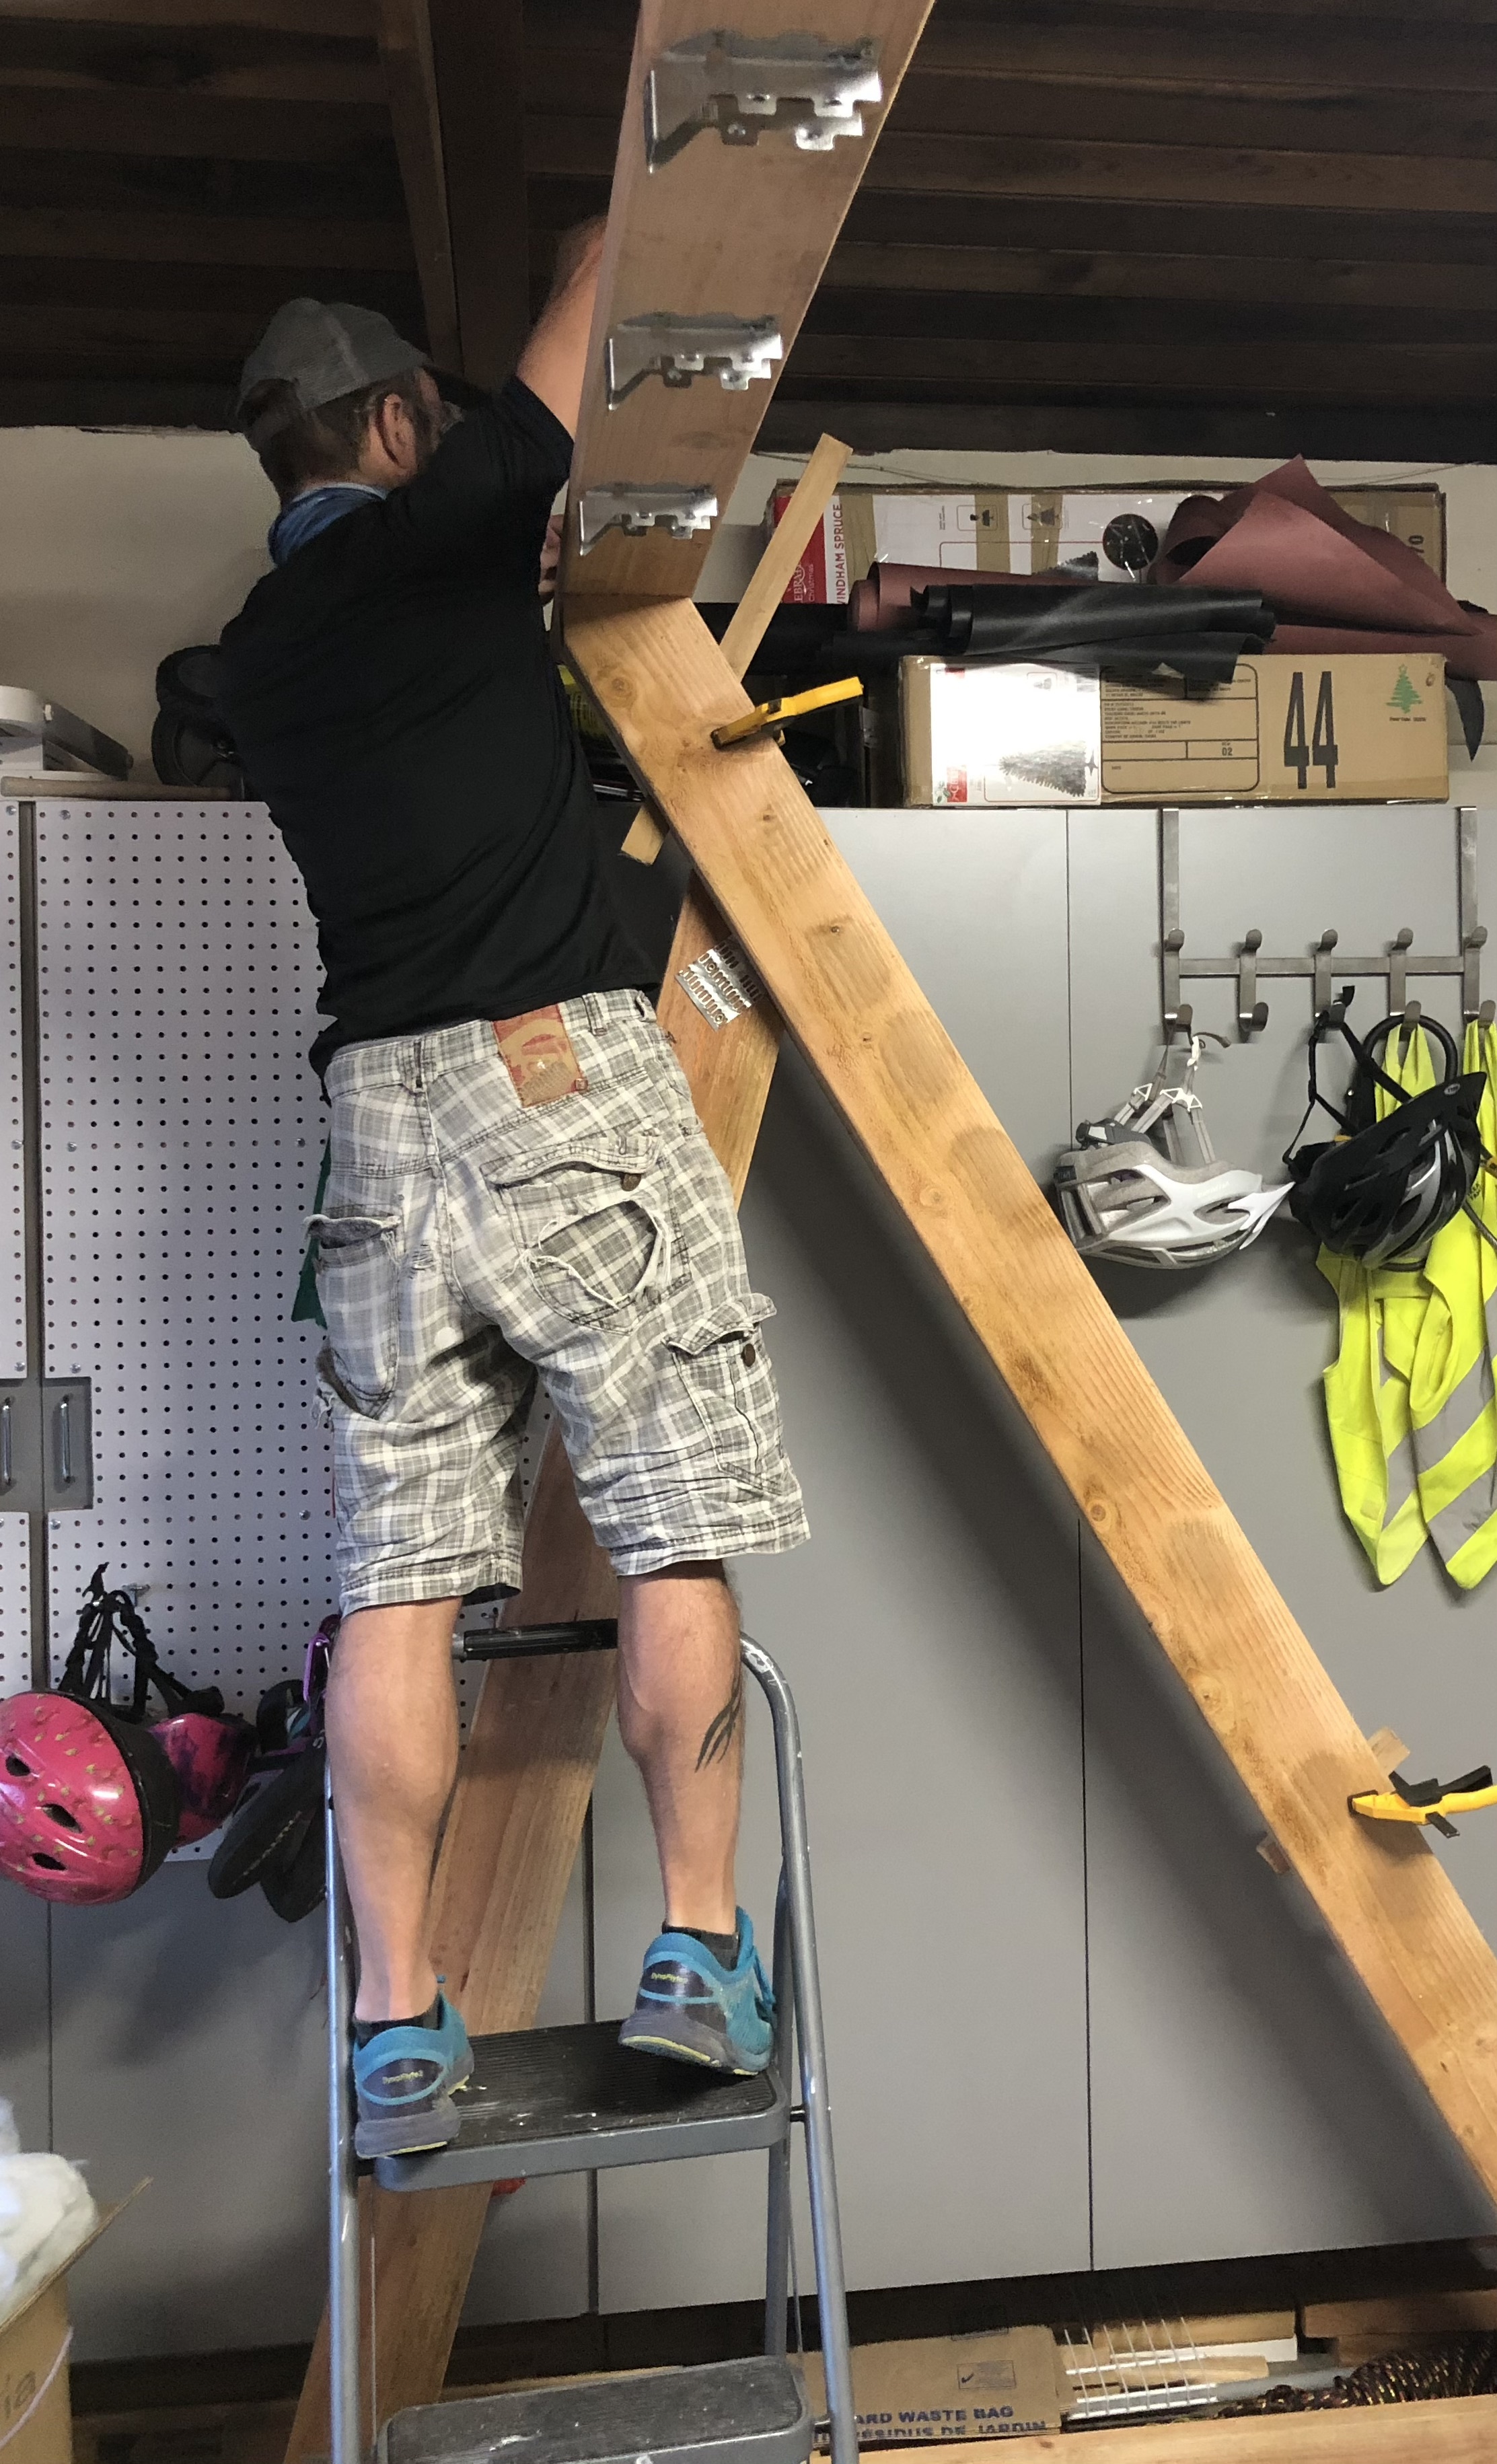
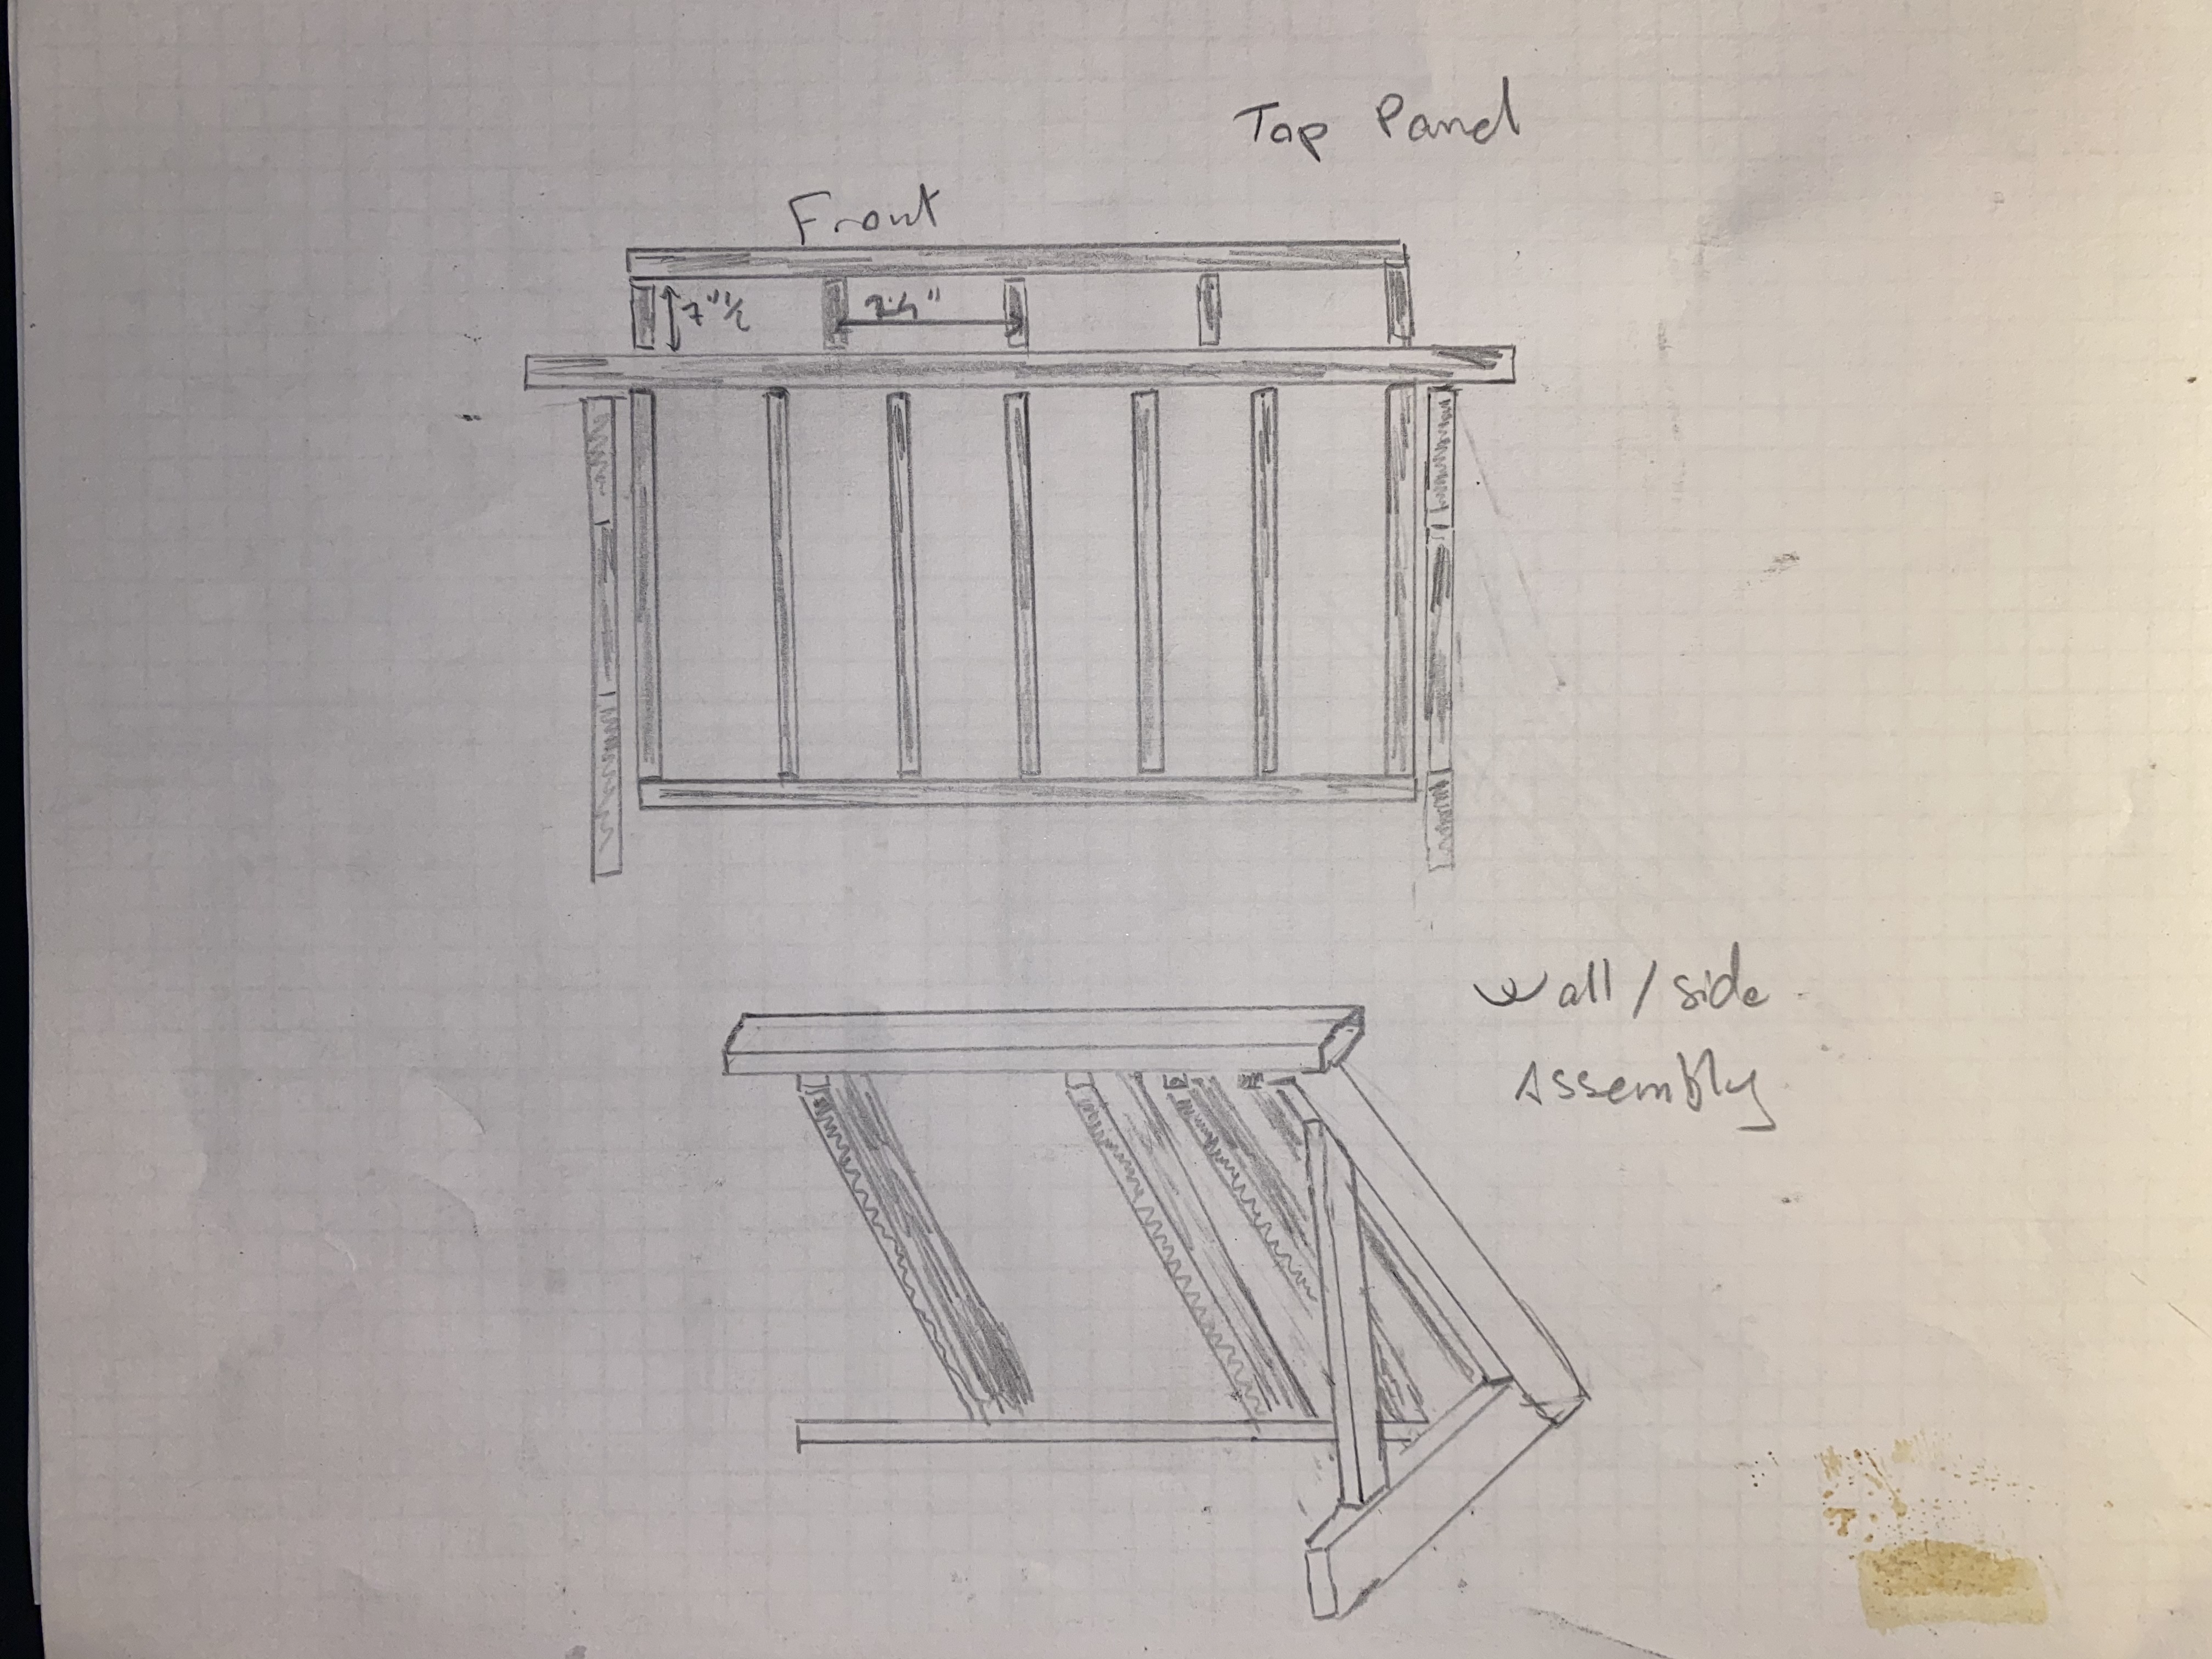
Side supports
I started by building the side supports. The supports are used to:
- hold the wall framework up
- prevent the wall from tilting forward
The supports will be attached to the wall frame using 1 hex bolt near the bottom, and 1 near the top.
The wall’s top plate, which has 1 foot wings on each side, is also resting on the supports and screwed using 3” screws.
The supports and the frame are not directly in contact, but a spacing of about 3/4” will be left so we can slide the side panels later.
Here is a rough diagram of what the 3 pieces of lumber that make up a side support look like (click to view full size).
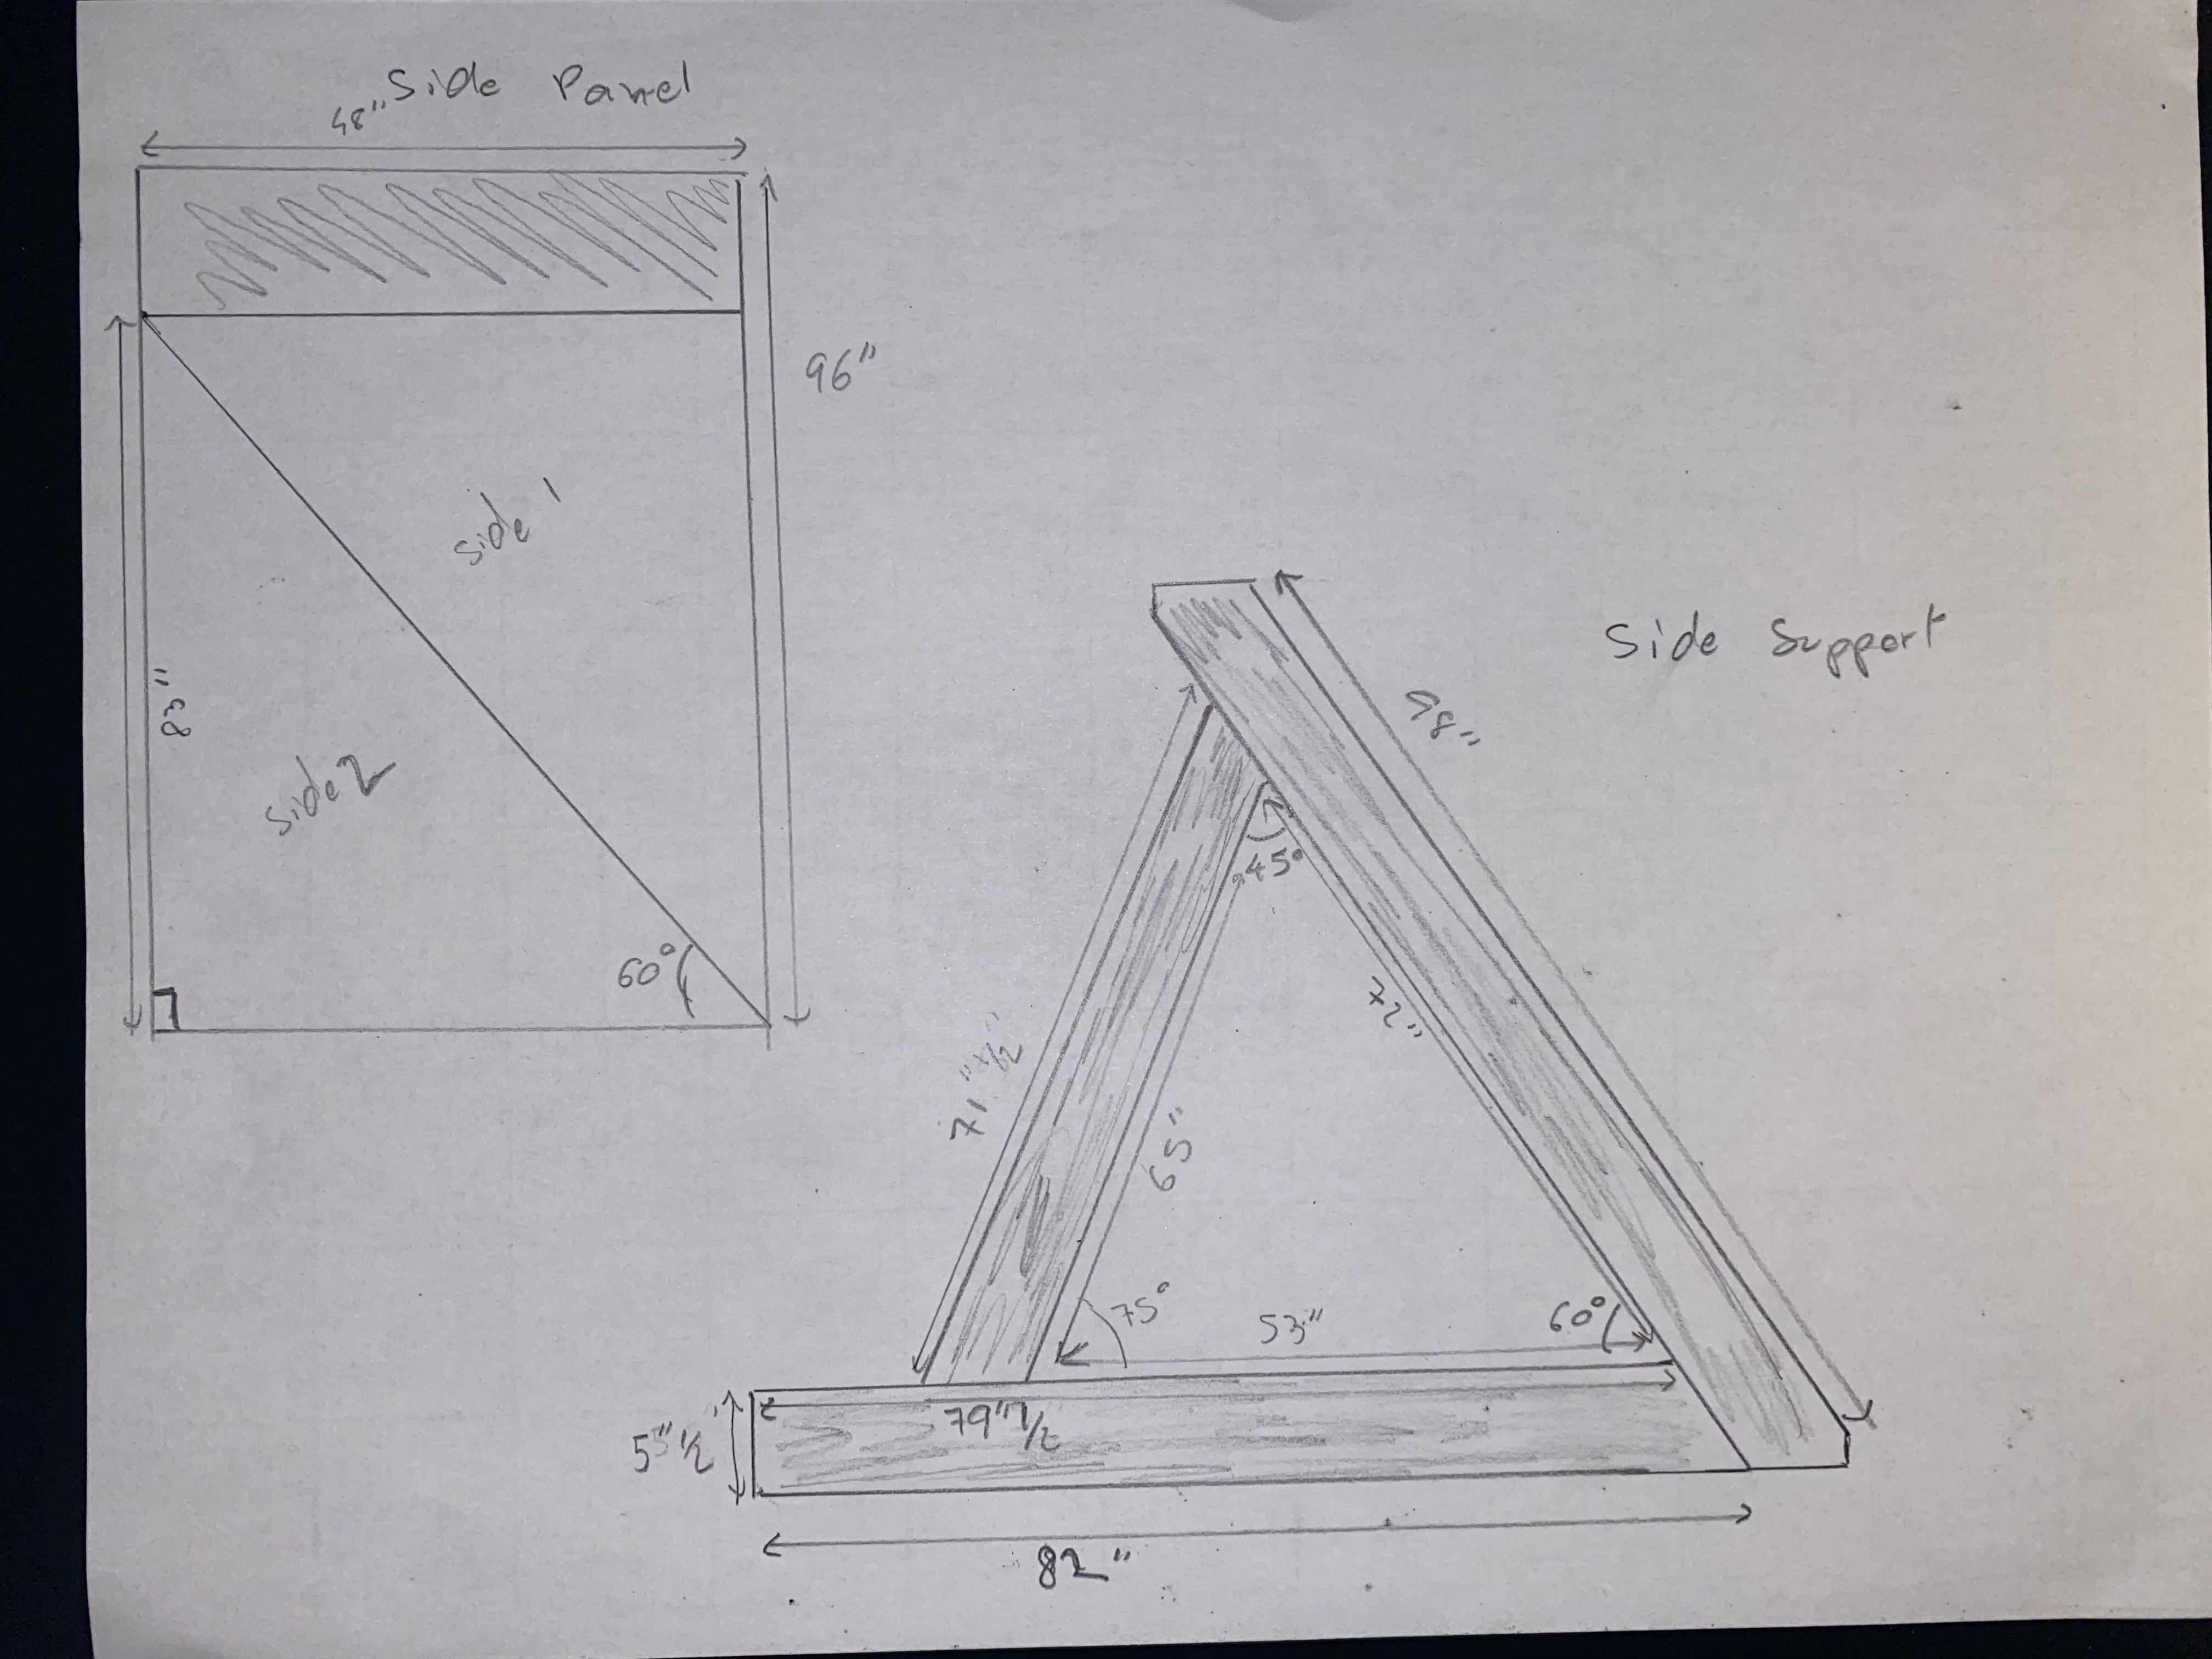
After cutting the pieces of lumber, I attached them together using 1 mending plate for each joint and a couple of 3” screw.
The mending plate themselves are not enough to hold the pieces together, screw a couple of 3” screws to hold the lumbers together, flip the support over and add the mending plates on the other side.
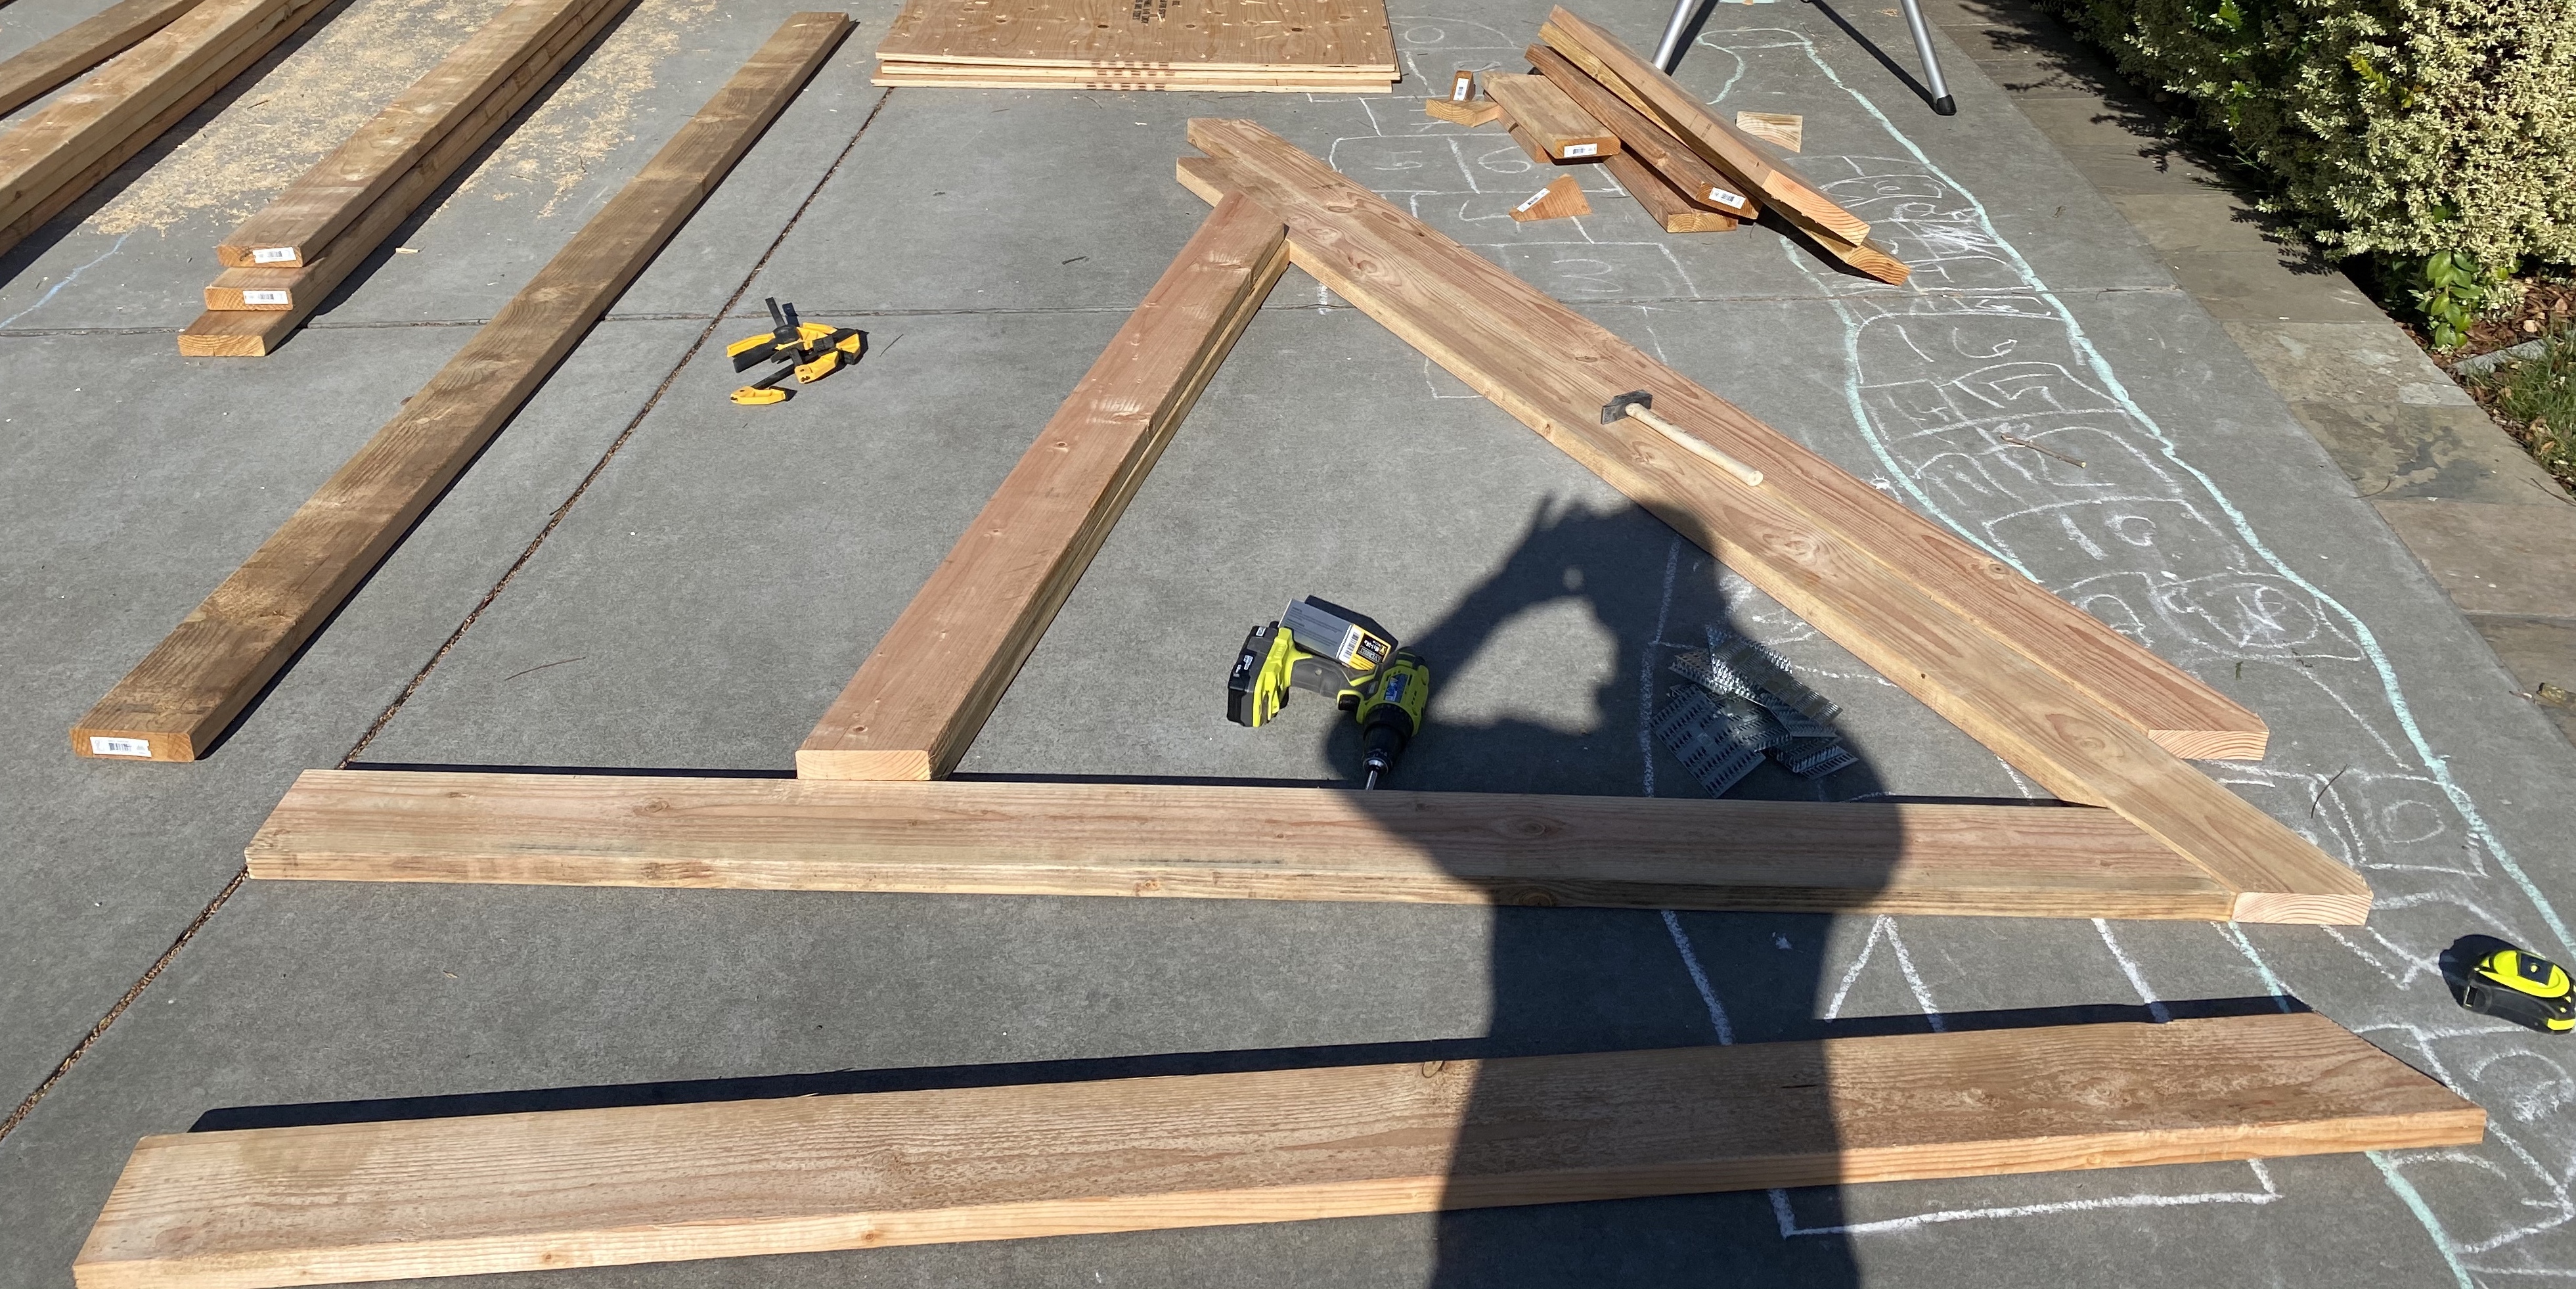
The lumber onto which the wall frame will be attached to needs to get a second cut on each 60 degrees angles in order to make the stud flush with the bottom/top plates.
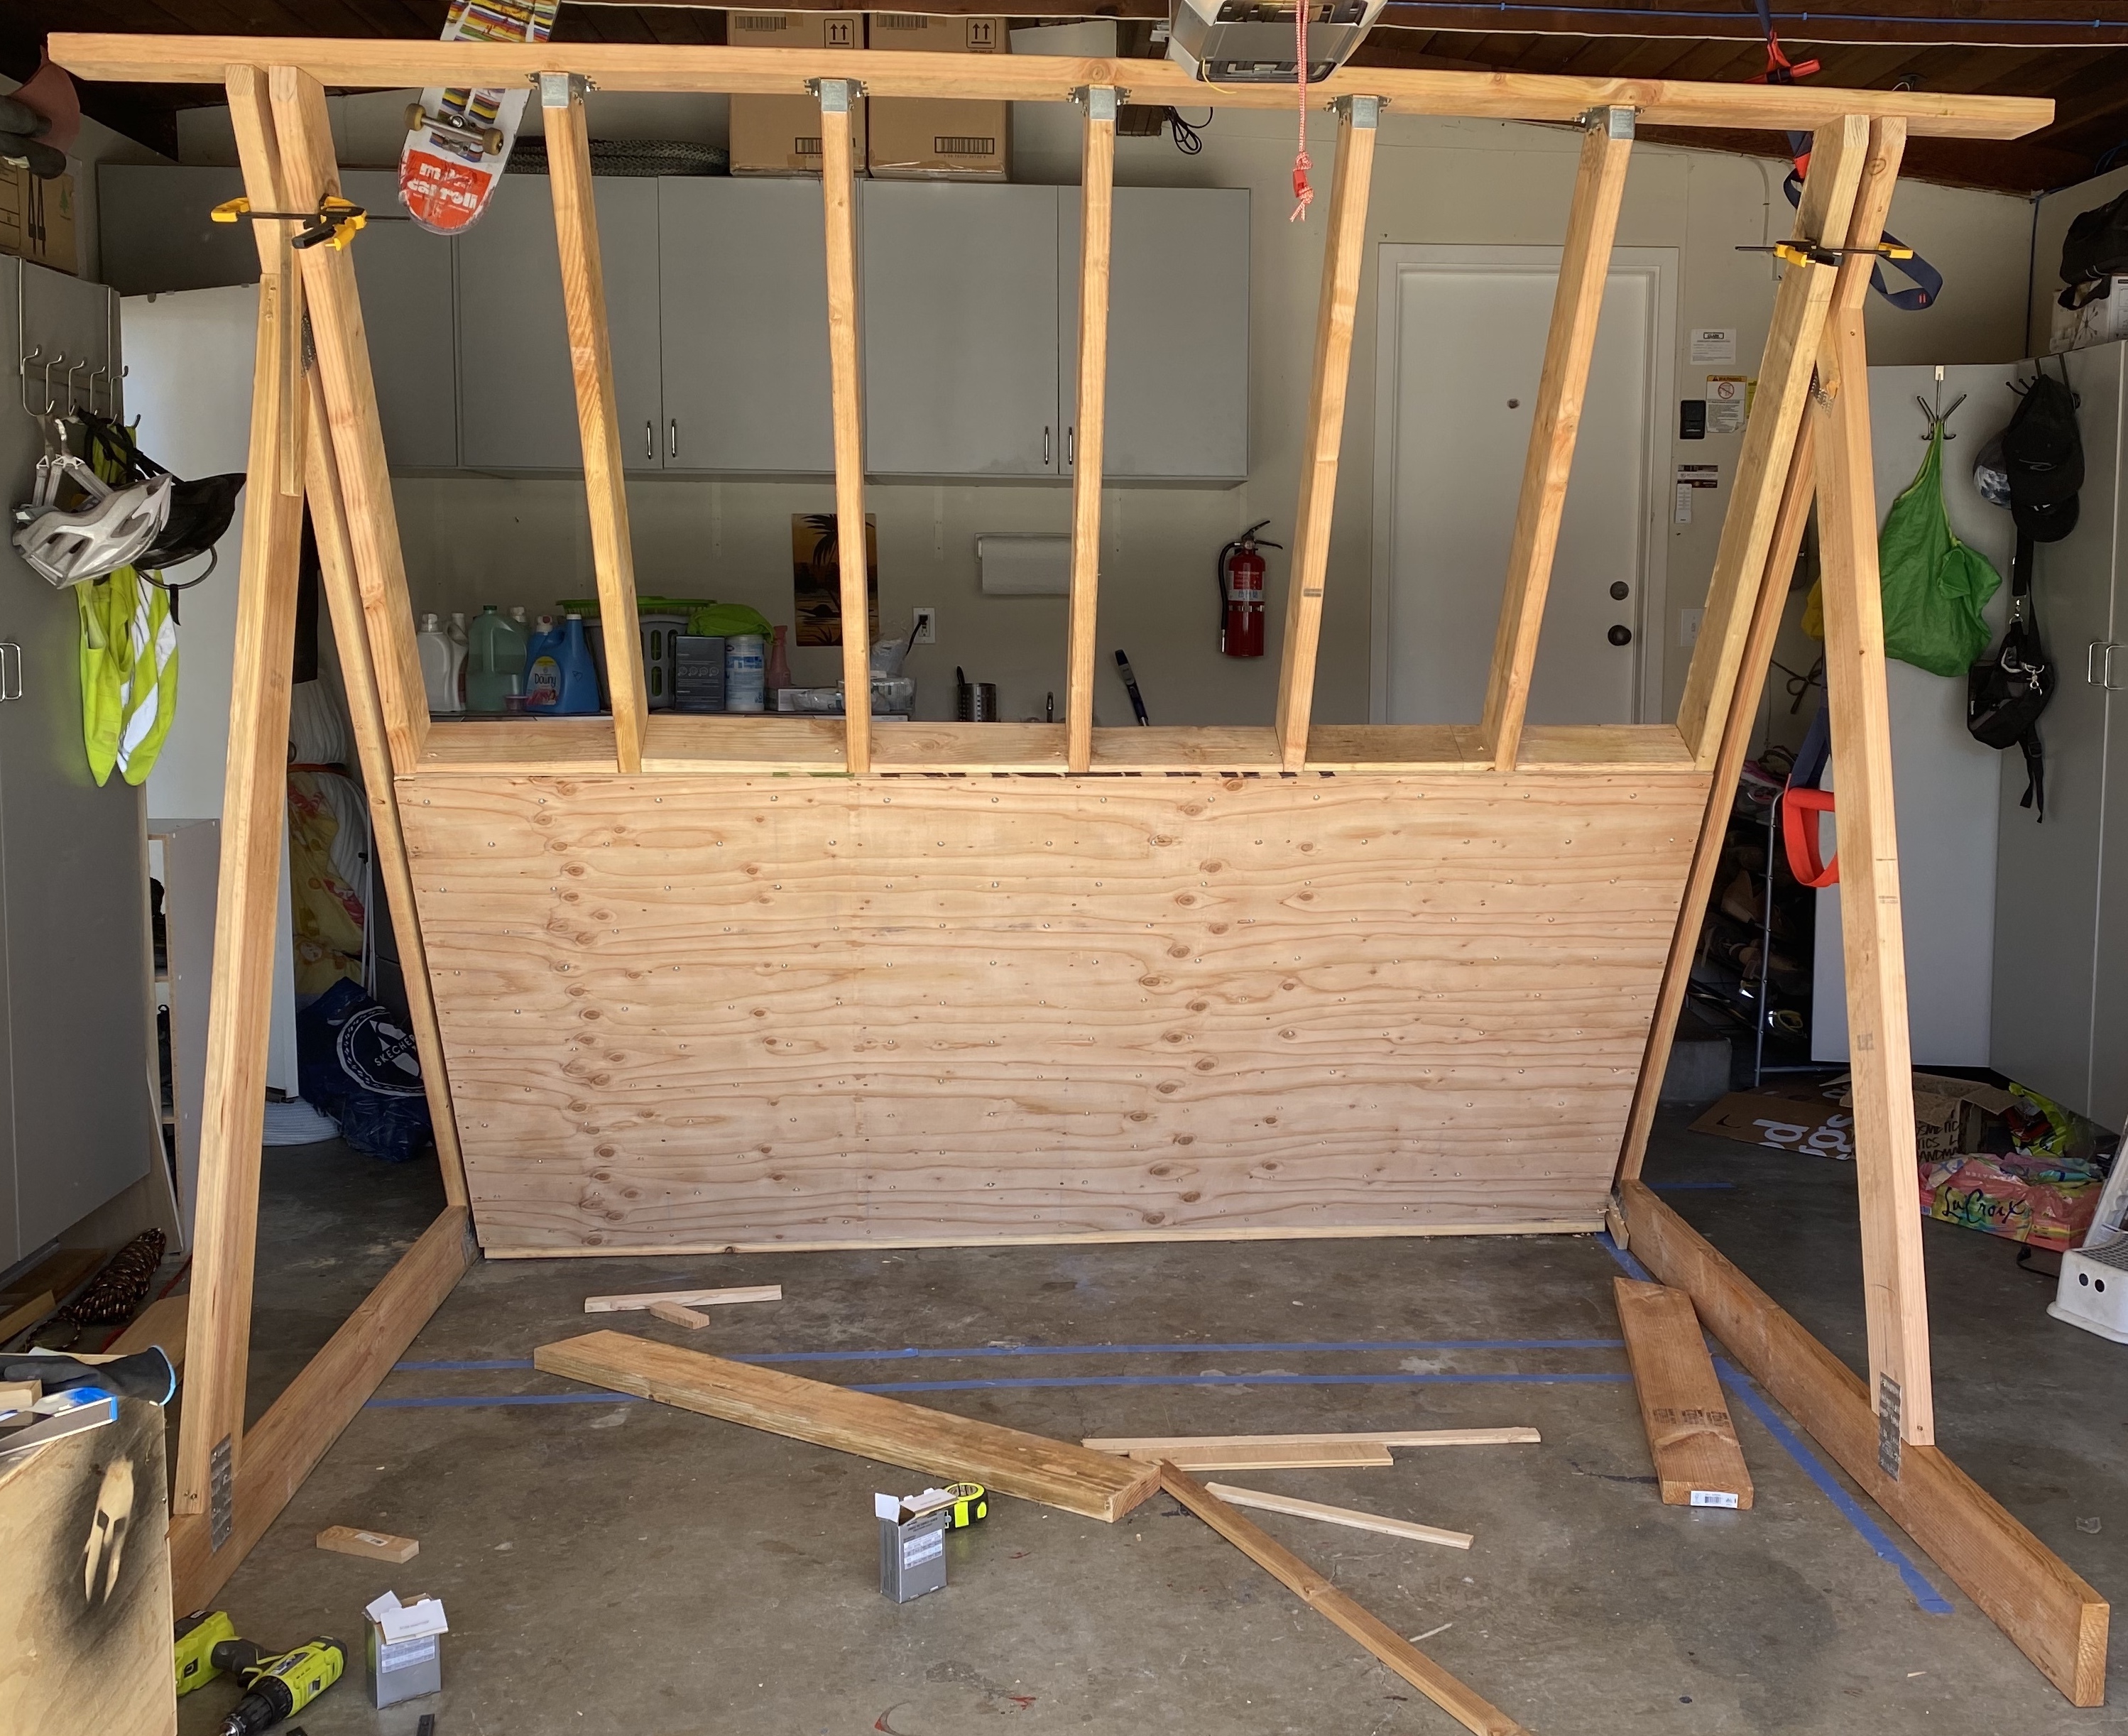
The wall frame
A good pre-read is Metolius Home Wall guide, mostly page 4.
The wall frame is made of:
- 1 top plate using a 2x6x10 lumber
- 1 bottom plate using a 2x6x8 lumber
- 7 studs (using 2x6x10) which are cut at 30% angle. Keep the scrap to make your blocking with later.
The top plate is slightly more than 8 feet so the top frame can rest on the side supports. While at it, I left all the spare length from the 10 feet lumber so I can reuse this to hang stuff or what not. With a 30° wall, the top plate is at roughly 7 feet high, which is more than enough to circulate under. If needed, I can cut it at a later stage.
When cutting the studs, take into account that you need to leave more than 8 feet between each 30 degree cuts because you also need to account for the cut to make the stud flush with the bottom and top plates (as well as the joist hangers).
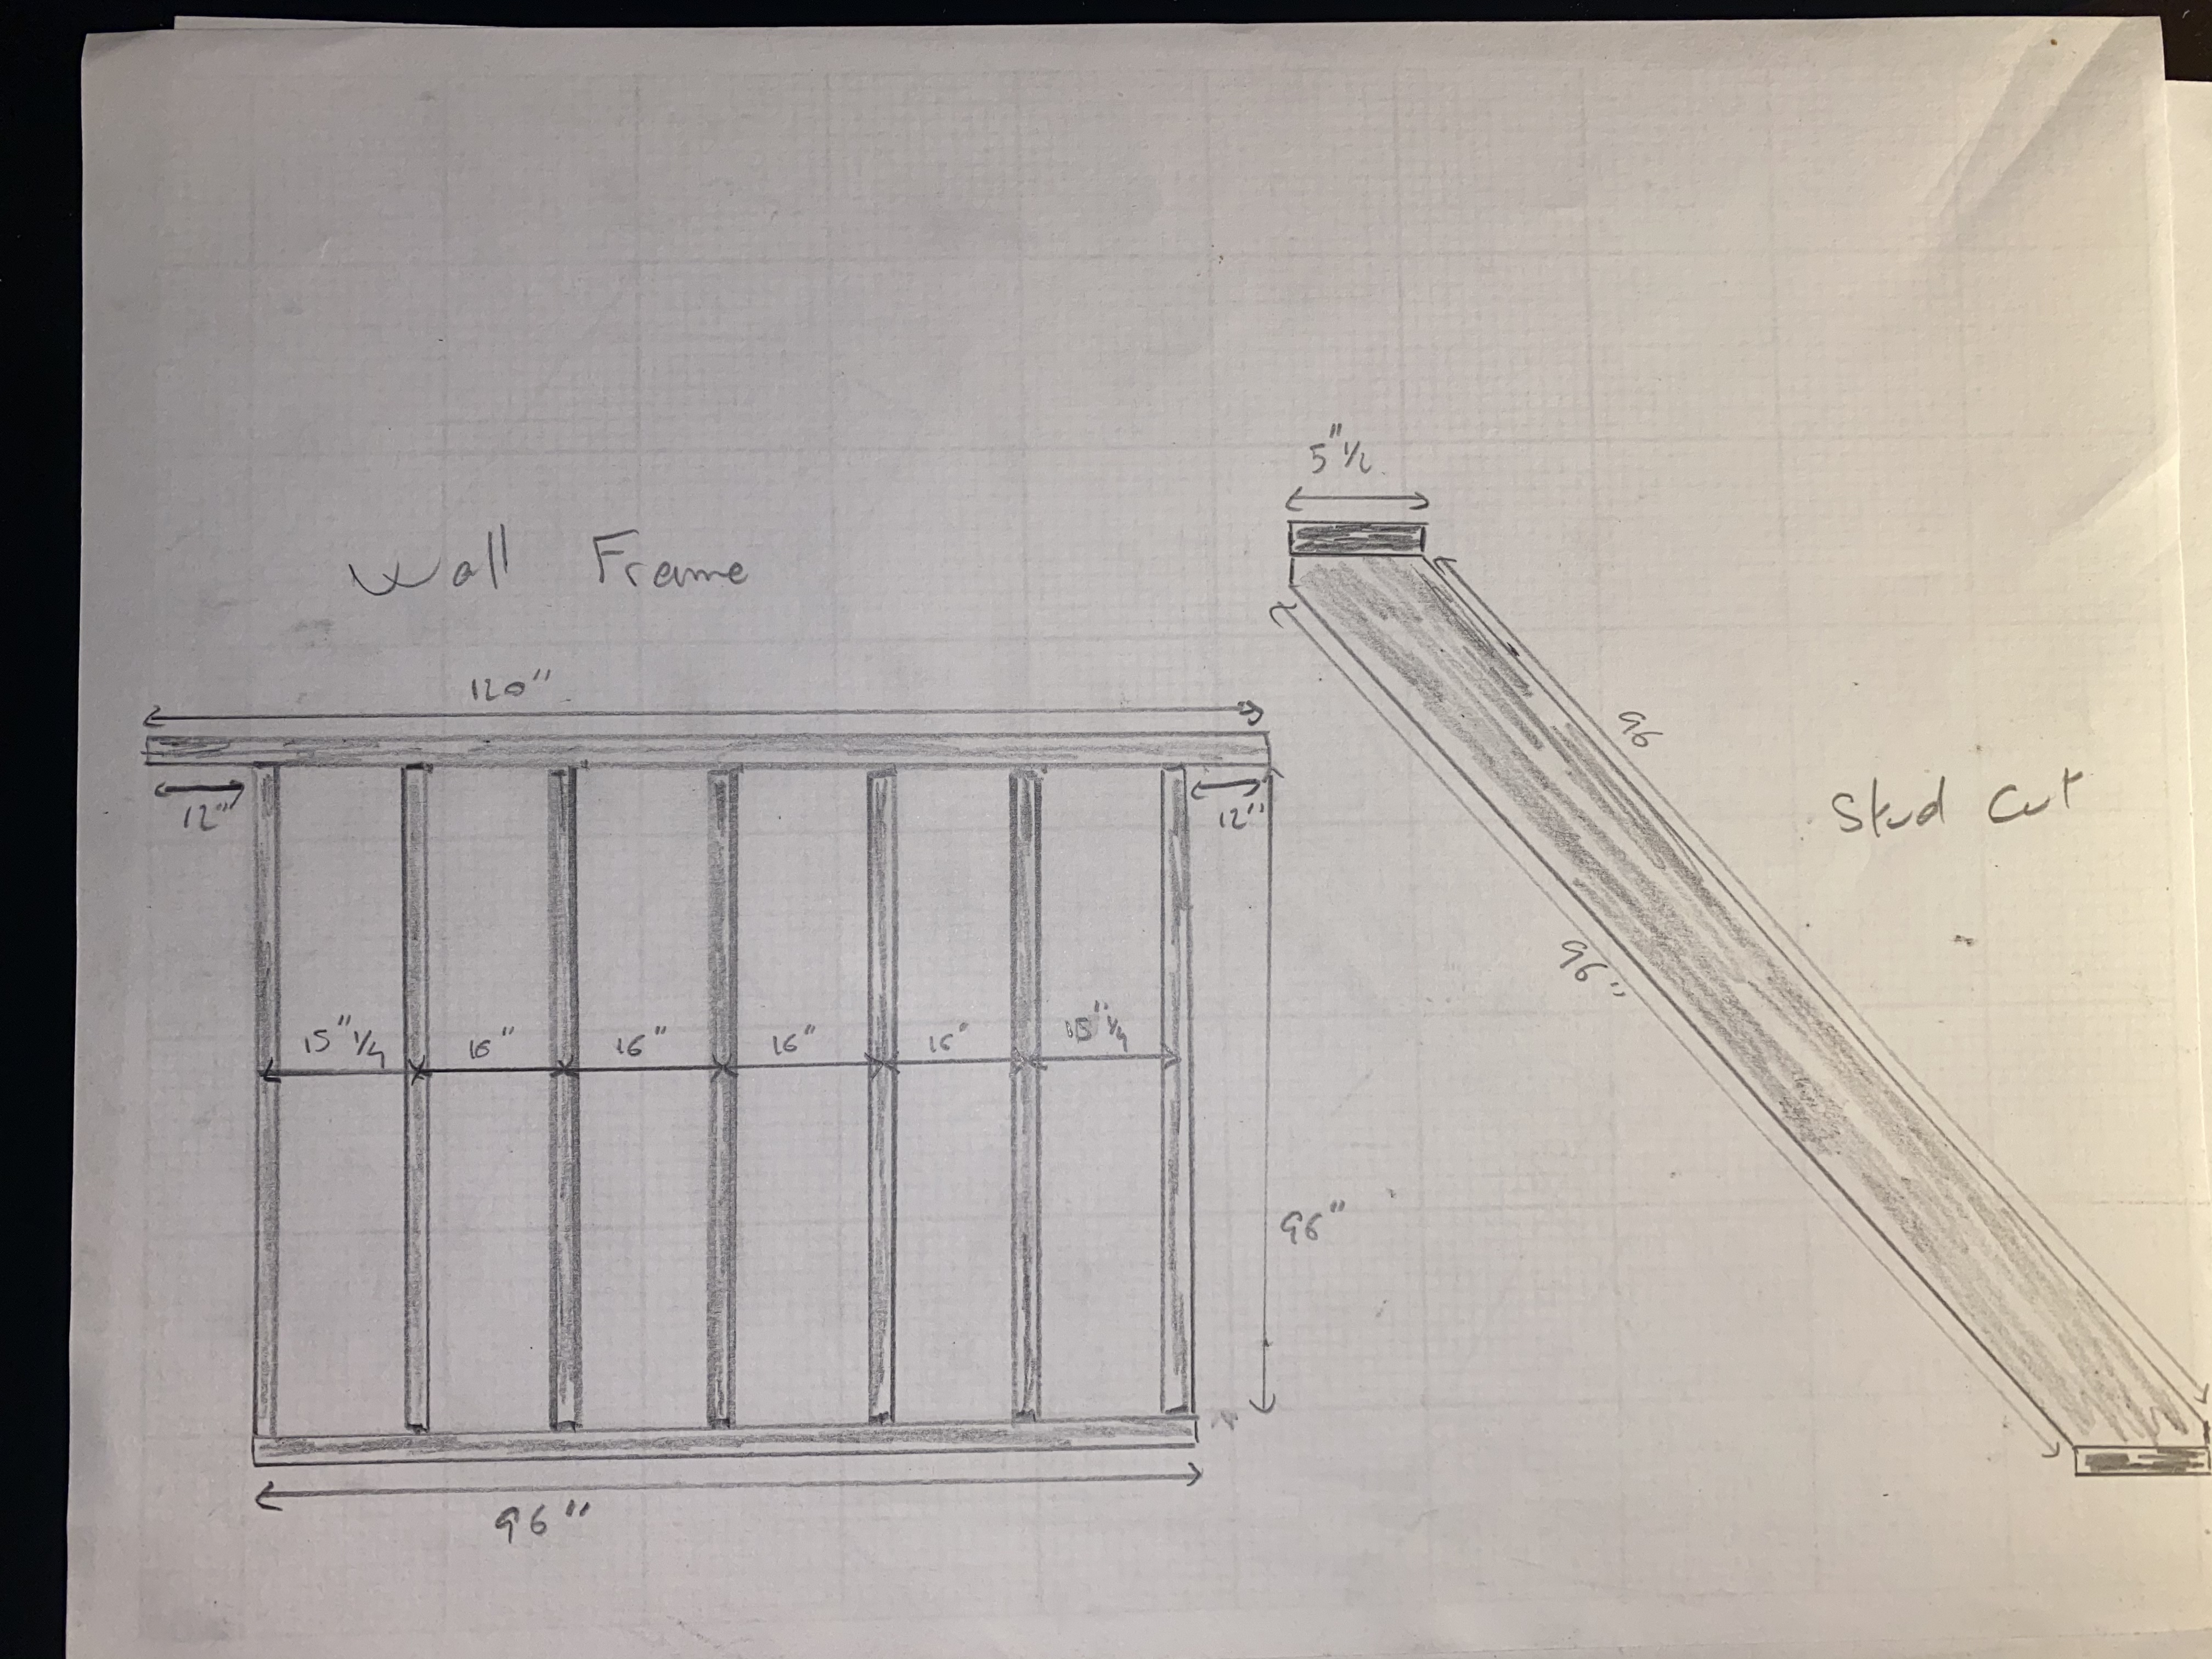
I assembled the top and bottom plates with the external studs and placed the joist hangers onto the top plate (the ones on the bottom plates are being added when attaching the studs). Joist hanger are 16” apart on center. Made the frame square by verifying that the diagonals are equals, screwed the top and bottom plates to the external studs.
With that frame, I brought it inside and fit it onto the top of the side supports, another pair of hands and a few clamps are really useful at that stage. You better do this before adding the internal studs or it will become very heavy.
With the wall frame fixed on the side supports, you can start positioning the internal studs into the joist hangers on the top plate, place the stud to be 16 on center on the bottom plate, install the joist hangers on the bottom plate and start screwing the studs to the joist hangers using the 1-1/4 screws.
Once done with that, use the scrap wood from the stud cuts and cut:
- 2x 15”1/4 pieces
- 5x 16” pieces
use them as blocking by screwing them at the 4 feet mark of your stud, on center. Refer to page 5 of the Metolius Home Wall guide to see how to screw them to the stud.
Mark all your studs at the 4 feet mark, it will be useful later when you are going to position the plywood. Likewise, mark the bottom and top plate at the 16 inch on center mark, it will be useful to locate where to screw the plywood so you don’t miss the studs.
Hole Pattern
As much as I have written this section after the framing, this can really be done at the same time than the framing as they are independent tasks.
I used a 4 inch grid pattern, starting 2 inches from the edge. This fits perfectly on a frame with studs 16 inches on center. It is a lot of holes to make and t-nuts to hammer though. Atomik website has a few more layouts.
Important: You want to make sure that the holes you are drilling are not going to fall on a stud or blocking.
Using a chalk line, draw your 4 inch grid on one of the nice side of plywood sheet, e.g the face where you will attach the holds. Stack it over the second sheet, align them and secure them with clamps.
Use a 7/16 spade bit to bore holes and drill every other holes of the grid, alternating on each row. The drill guide can become handy to make boring holes vertically easier and straighter.
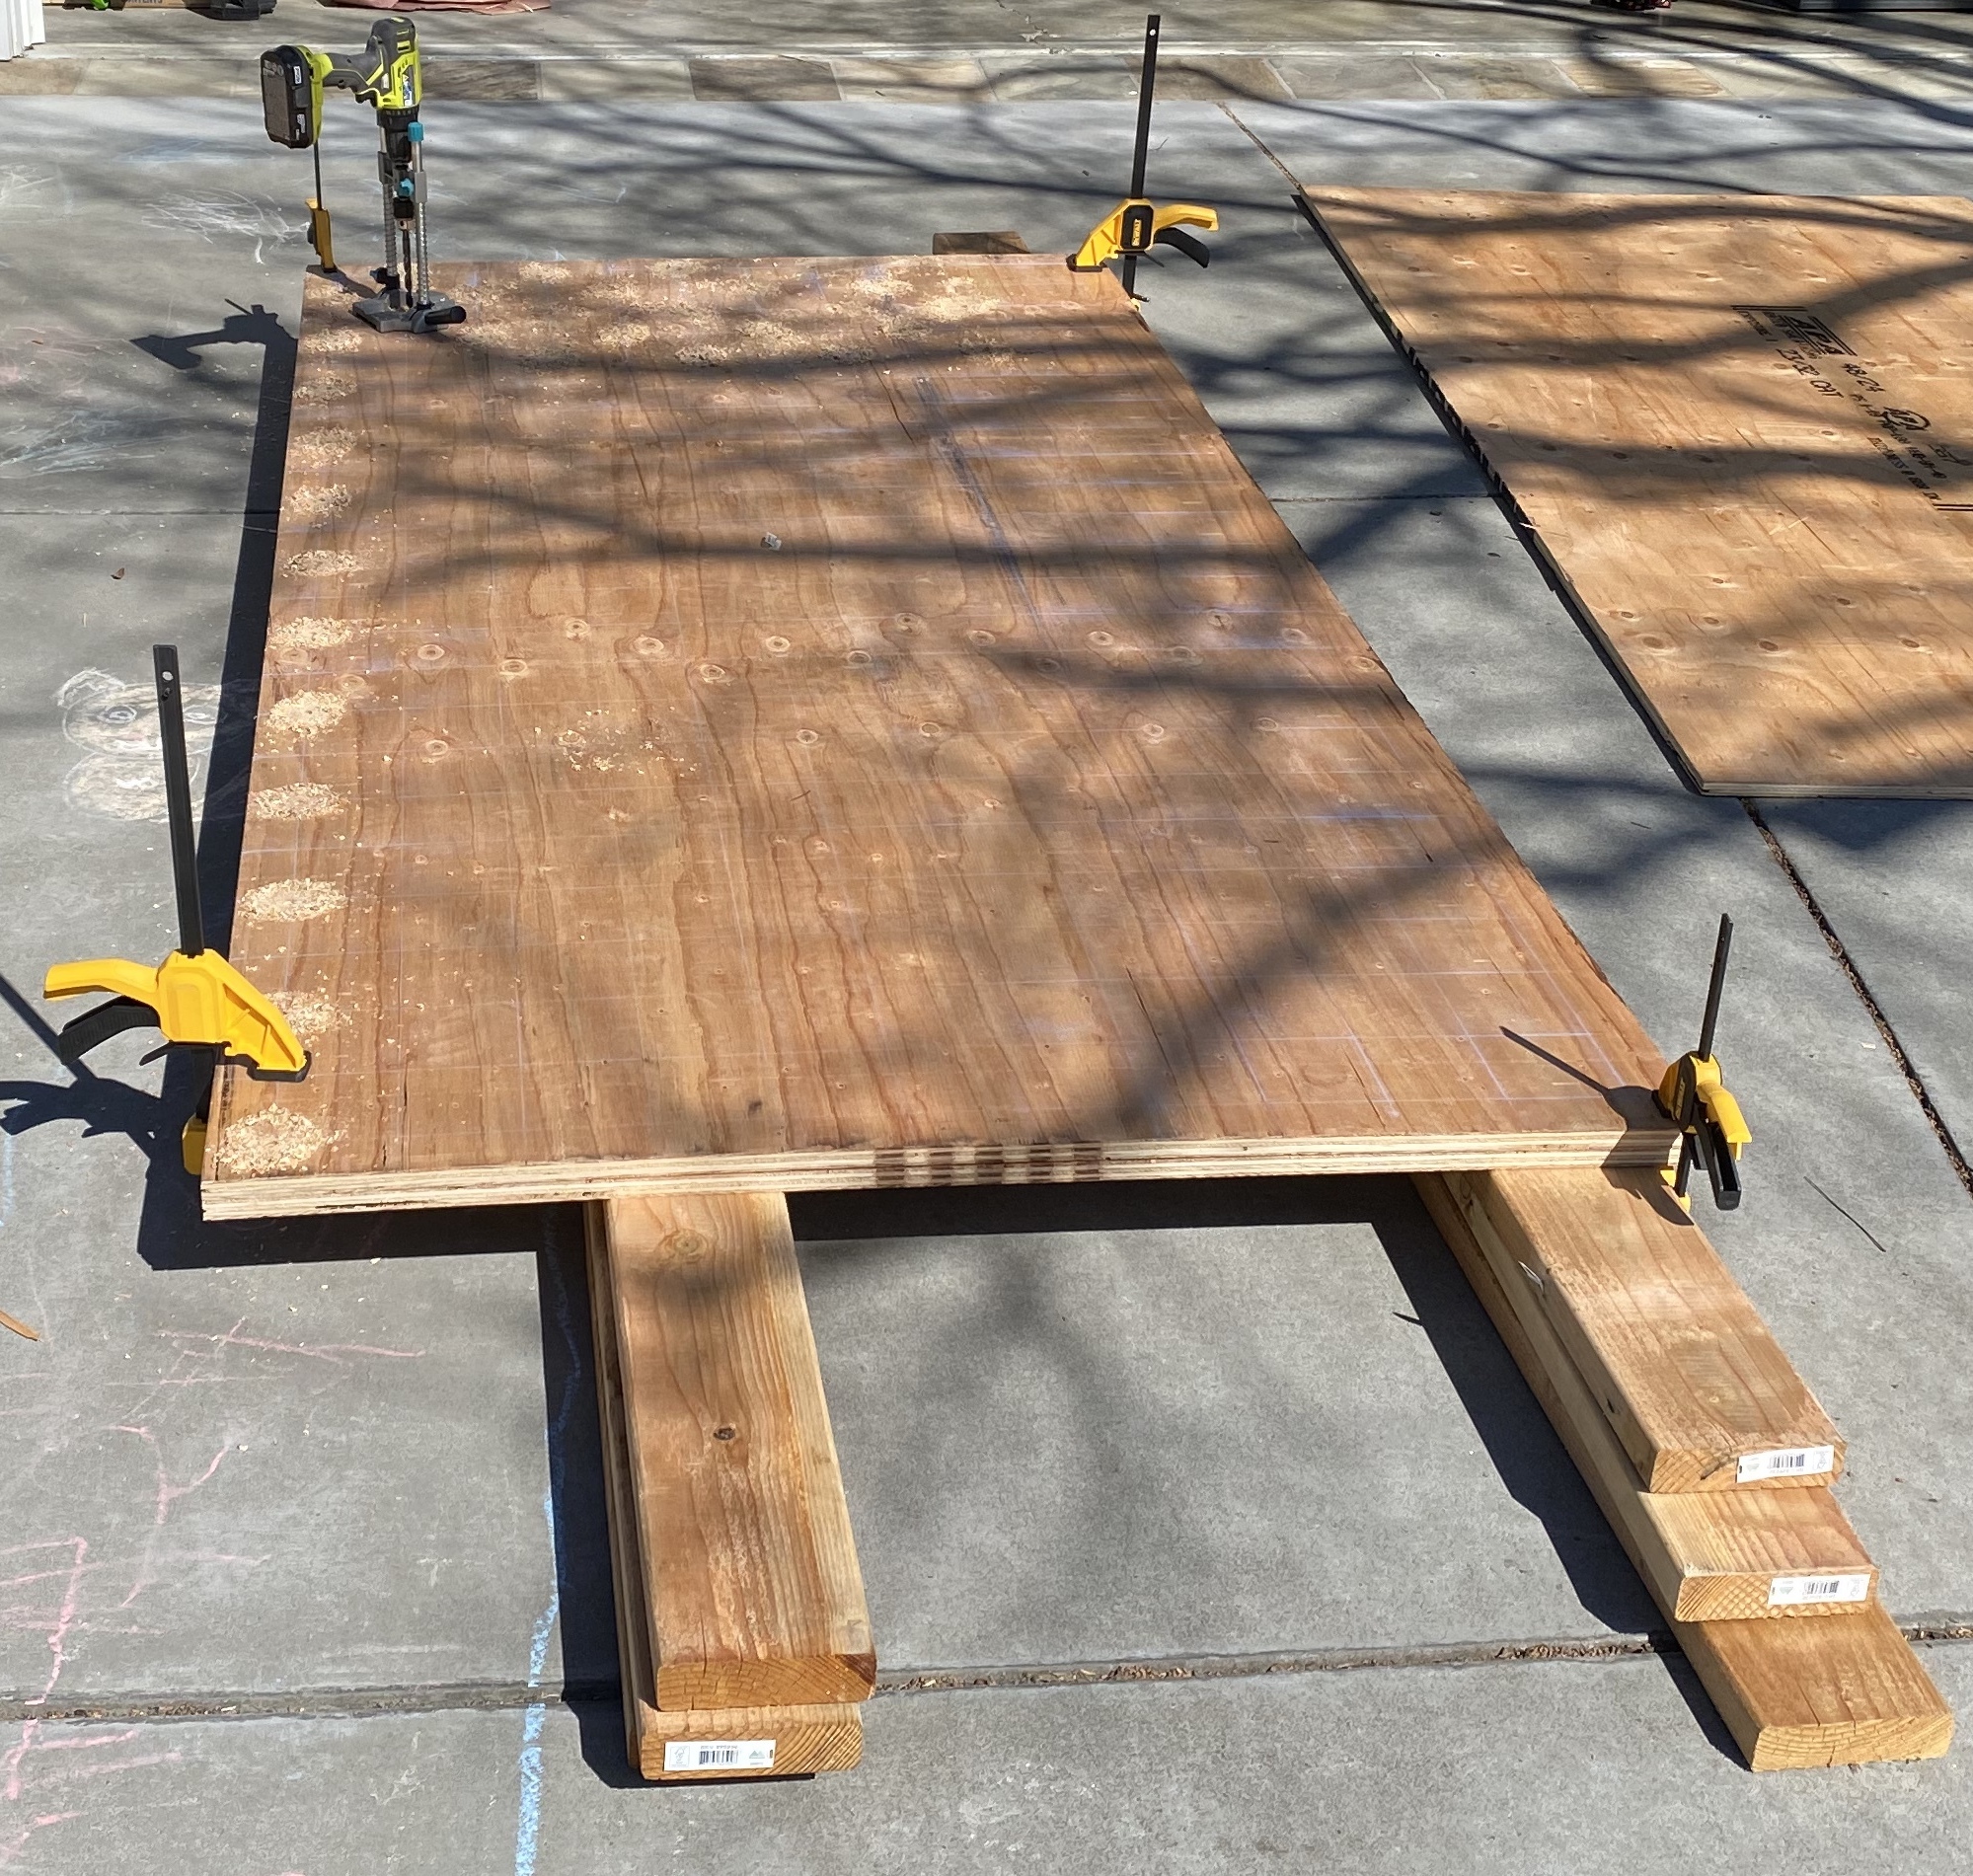
Flip the plywood, removing wood chips, and hammer the t-nuts in.

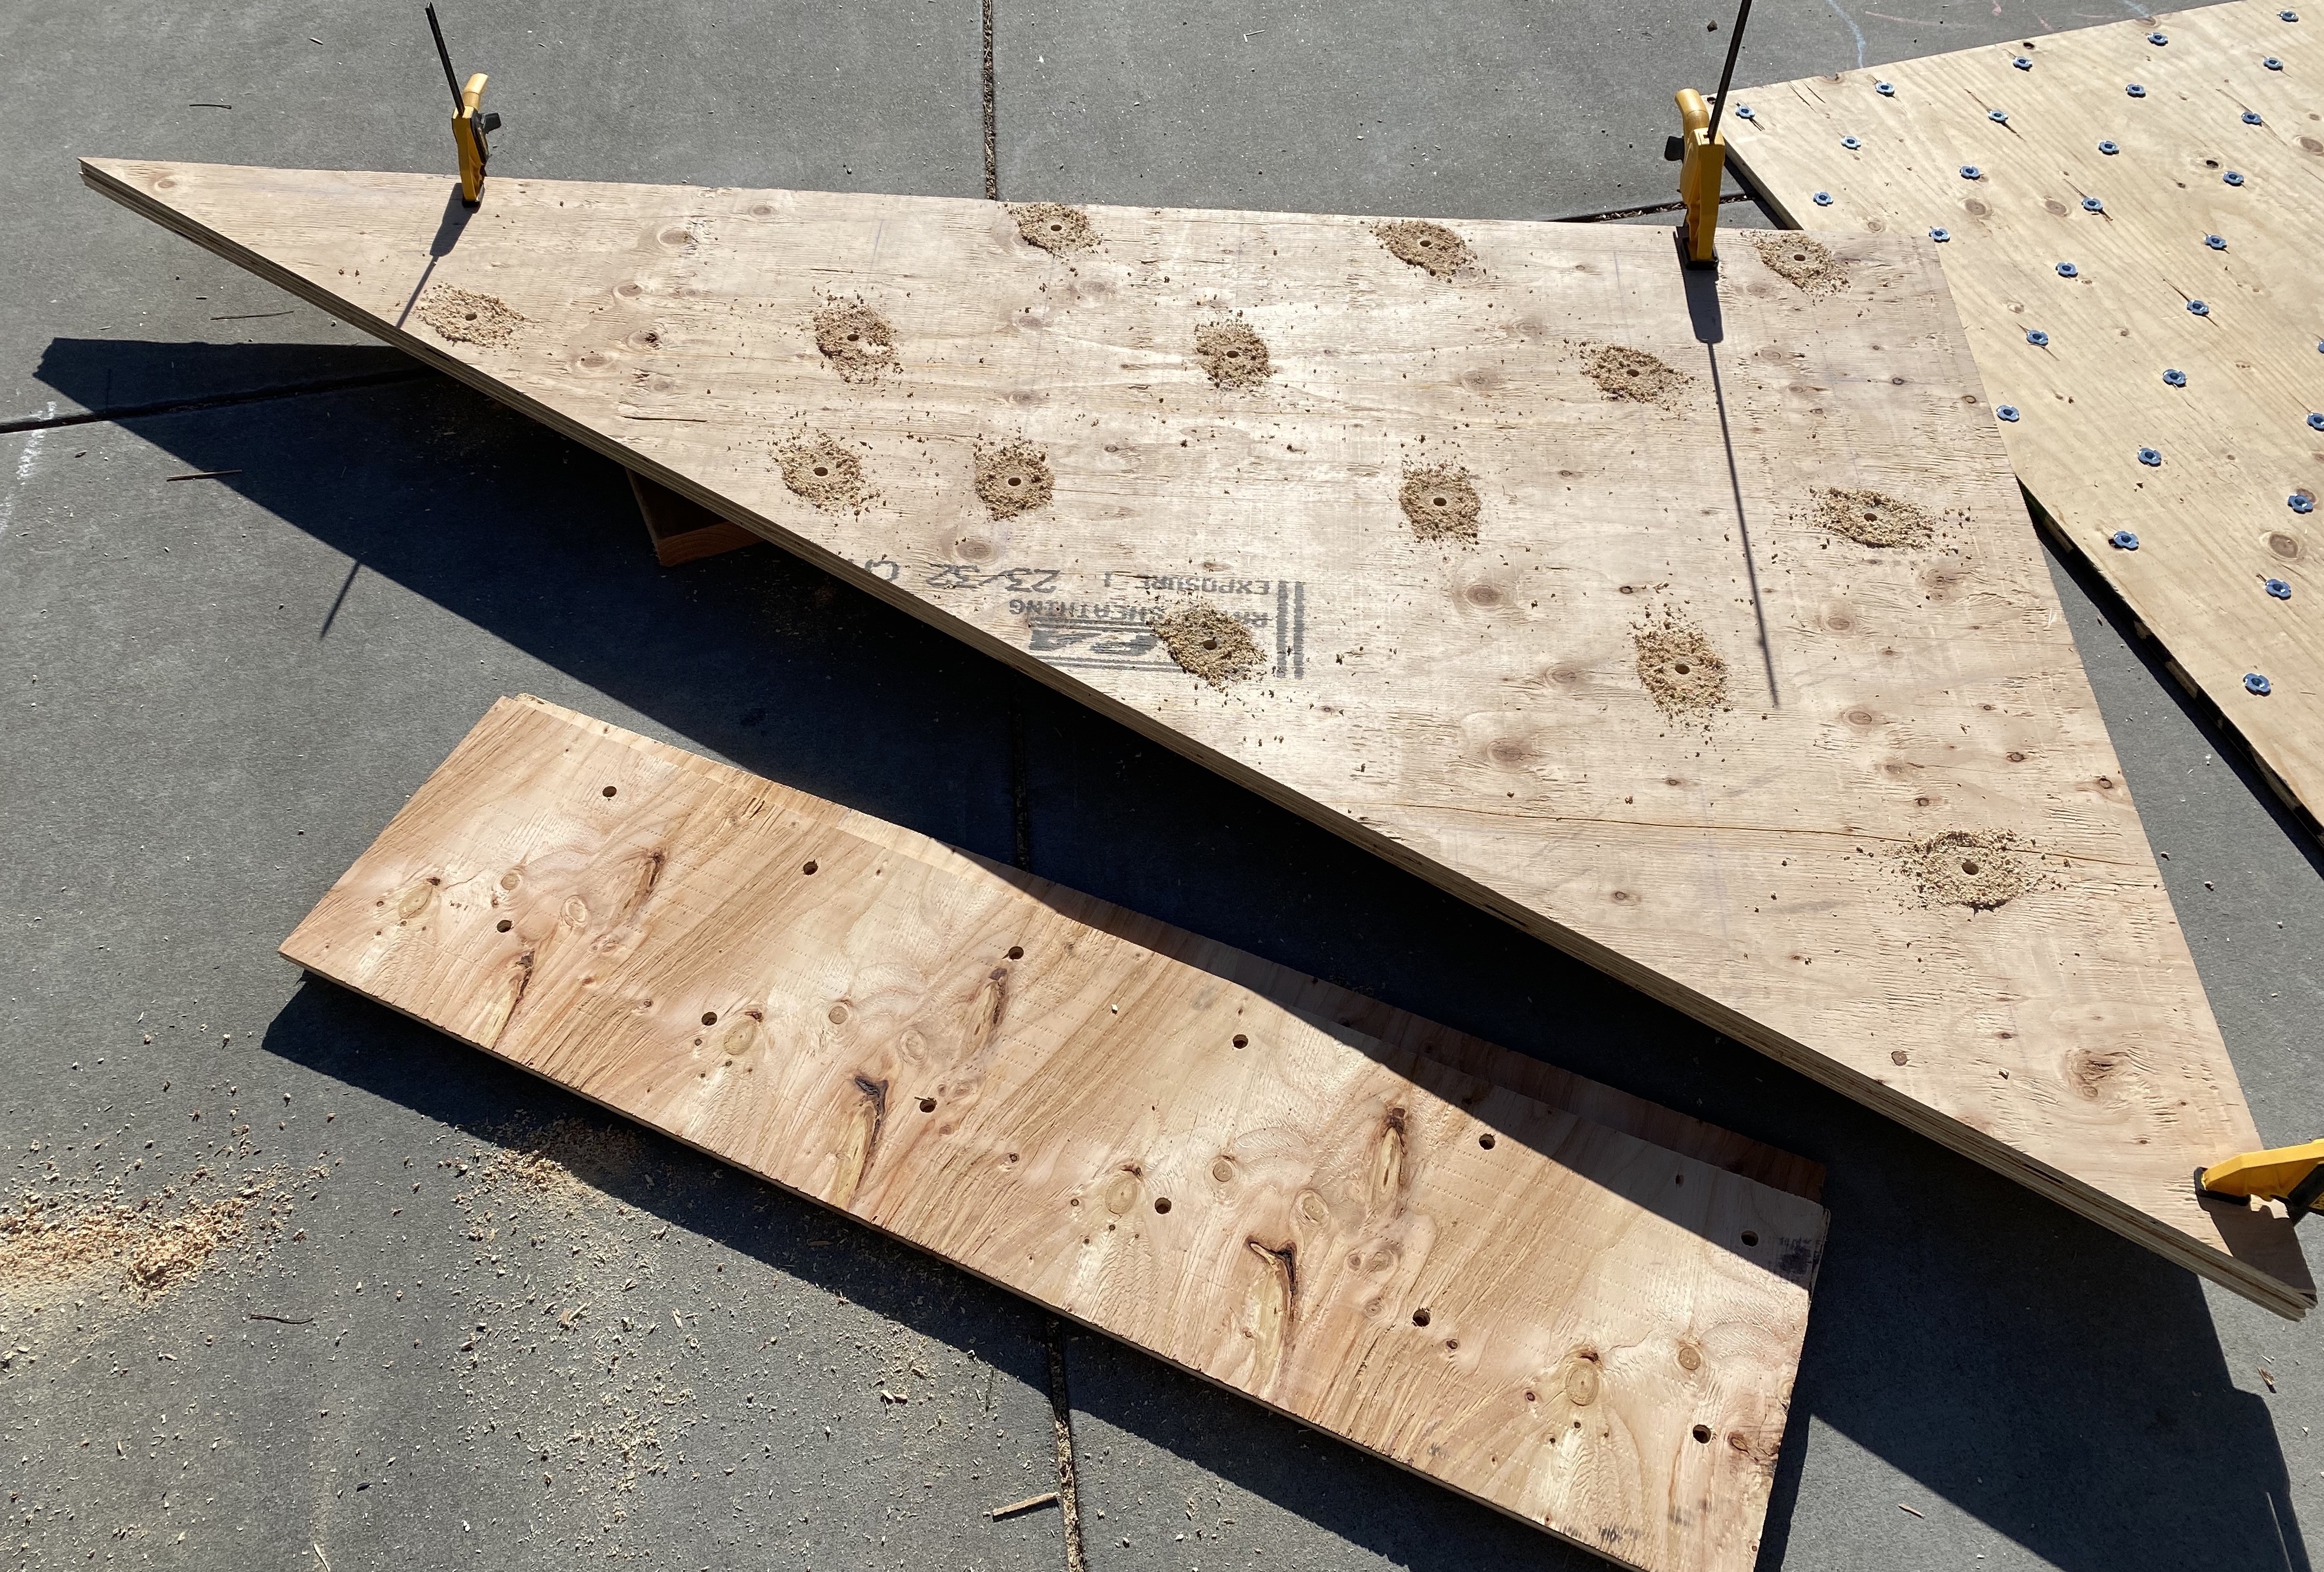
For the side panel plywood, I positioned the piece over the support and drew a rough location of the side support stud in order to not bore holes at a stud location. Then, I traced a 8 inch grid with an offset of 6 inch from the bottom.
Assembling plywood to the frame
Now that the plywood is ready, position one sheet against the bottom part of the frame. Clamps are useful here again. Use scraps from your lumber cuts to rest the plywood sheet at the same level than the bottom plate with no effort.
Important: If you are going to put side panels later, make sure you leave enough room (3/4”) between the side support and the plywood sheets so you can slide it though later.
Once happy with alignment, put a couple of 2” screws and, using the marks done on your bottom plate, use the chalk line to draw line along the center of the studs. Mark the sides at every 6 inches (see page 6 of Metolius Home Wall guide), use the chalk line and finish your grid. Screw a 2” screw at every intersections on the grid.
If you have put blocking, also add another screw in between each studs into the blocking.
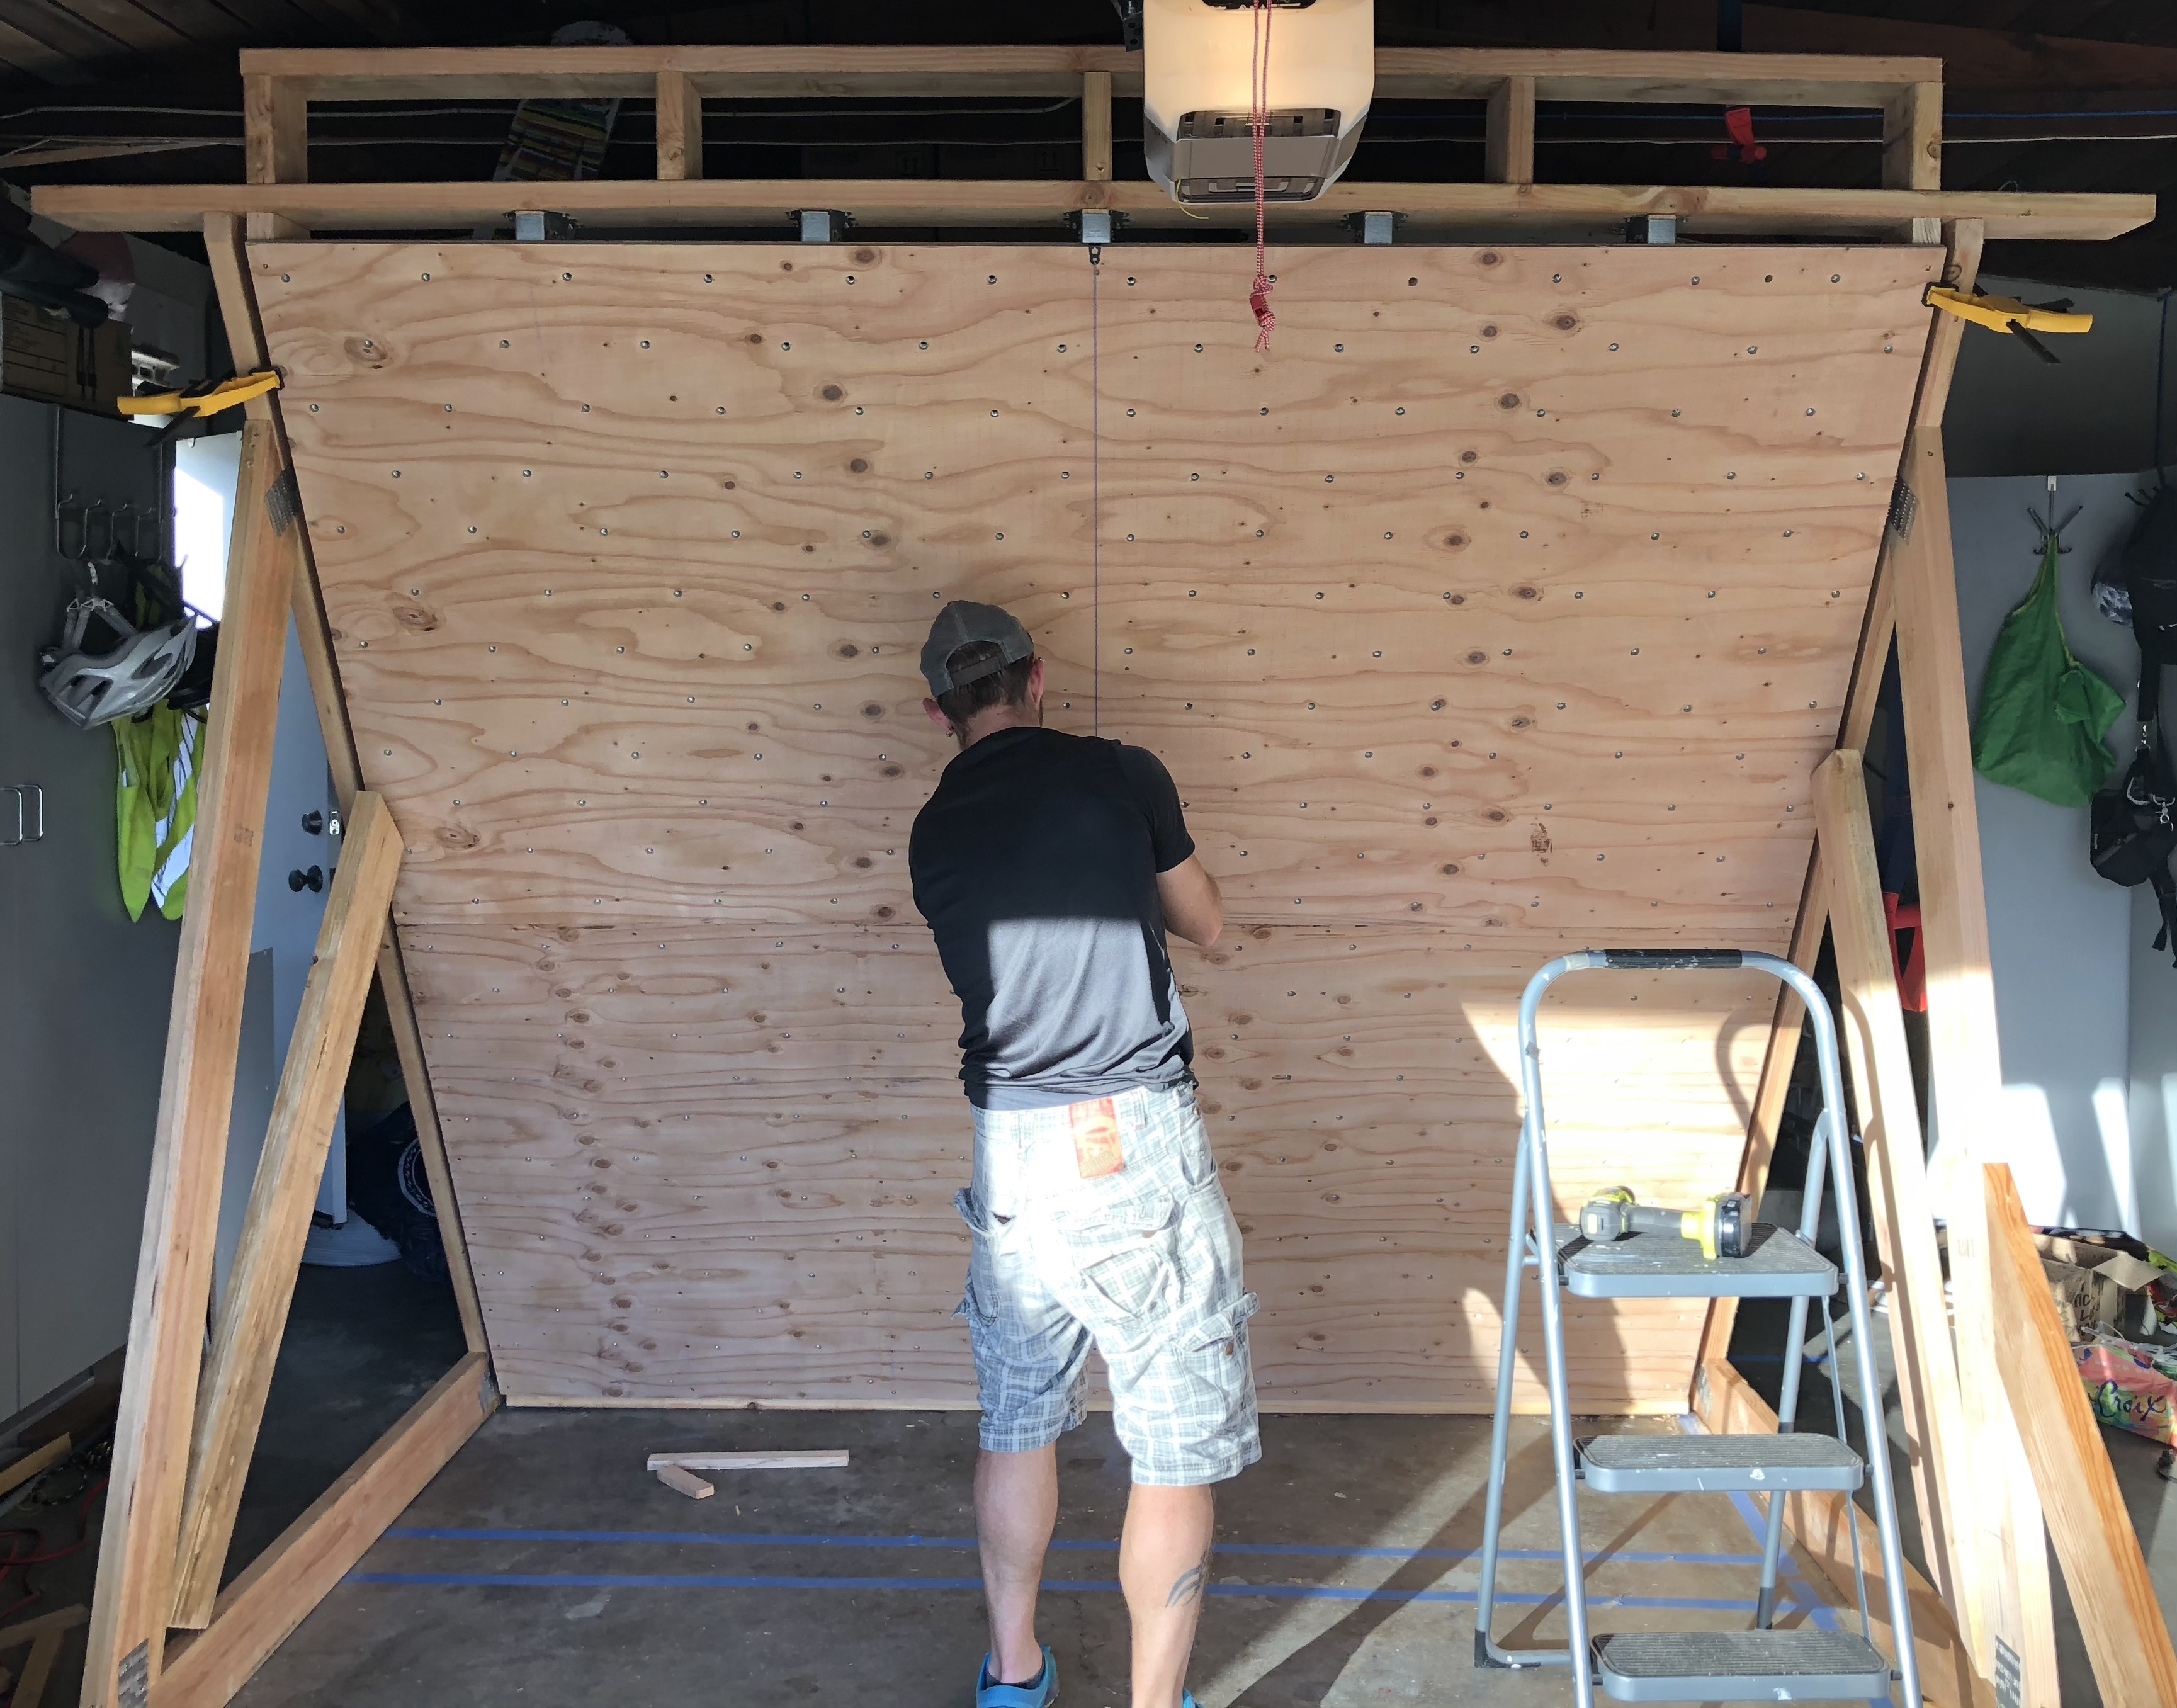
Next, set the top, this can be a bit more tricky and having someone to help is definitely of big help. One trick is to lift the plywood and let it rest on a step ladder, thread a rope in a couple of t-nuts close to the middle of the top plate, and secure the plywood to the frame. If the ply was going to slip, it will be hanging rather than falling on you.
Apply the plywood against the frame and make it flush with the bottom sheet. Secure it with clamps and scrap wood to keep it in position. Adjust the position so it is aligned with the bottom sheet and start screwing it.
Like with the bottom sheet, you will want to make a grid with a chalk line to know where to put the screws. Use the marks from the chalk line on the bottom sheet, the ones you made previously in the top plate, and every 6 inches on the side.
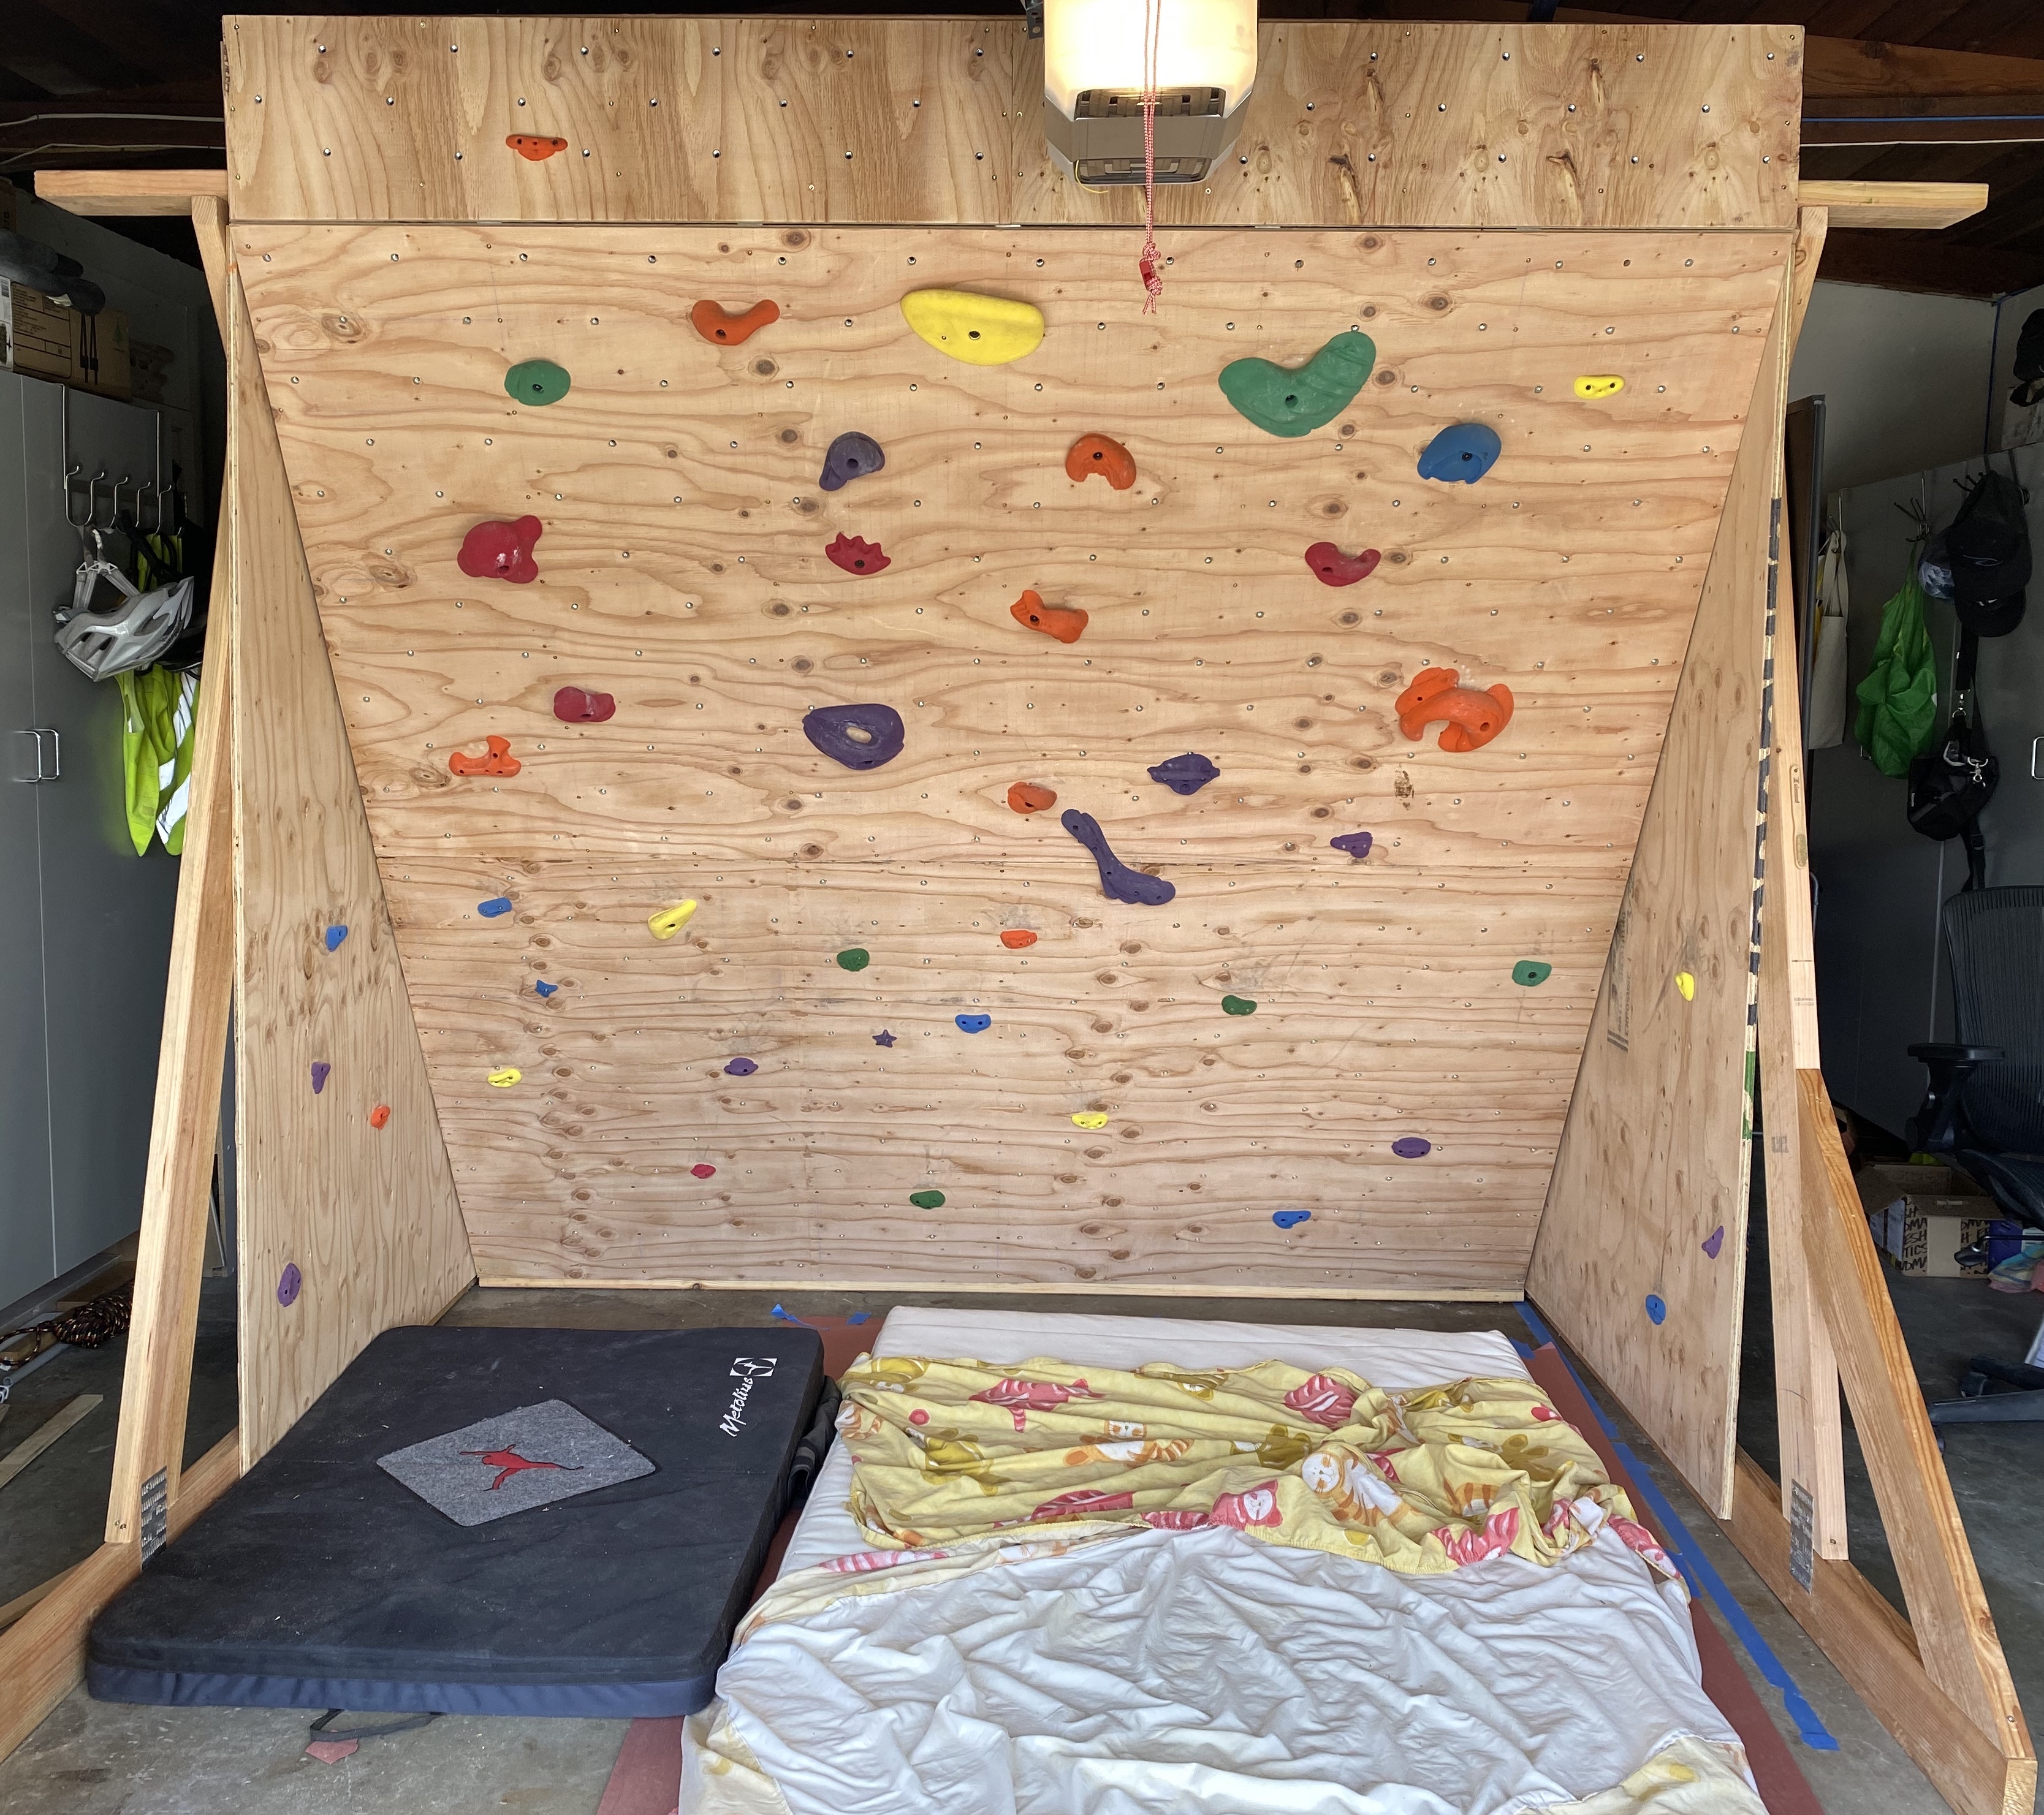
Top Panel
The goal of the top panel was to make most use of the space I had, this is going to be a good spot to put a hangboard, as well as provinding an option to put holds that are not directly inline with the main wall.
I decided to only put one stub 24 on center (instead of 16 on center like the wall). Between the top of the top plywood sheet and the bottom of the top place, there were 1.5 inches, hence I needed to cut pieces of 7.5 inches studs onto which there is another top plate.
Cut the 2x4 plywood sheet in 2 along the length and get back to your chalk line. I did a 6 inch grid with an offset of 2 inches from the side, and 4 inches from the bottom in order to avoid the studs.
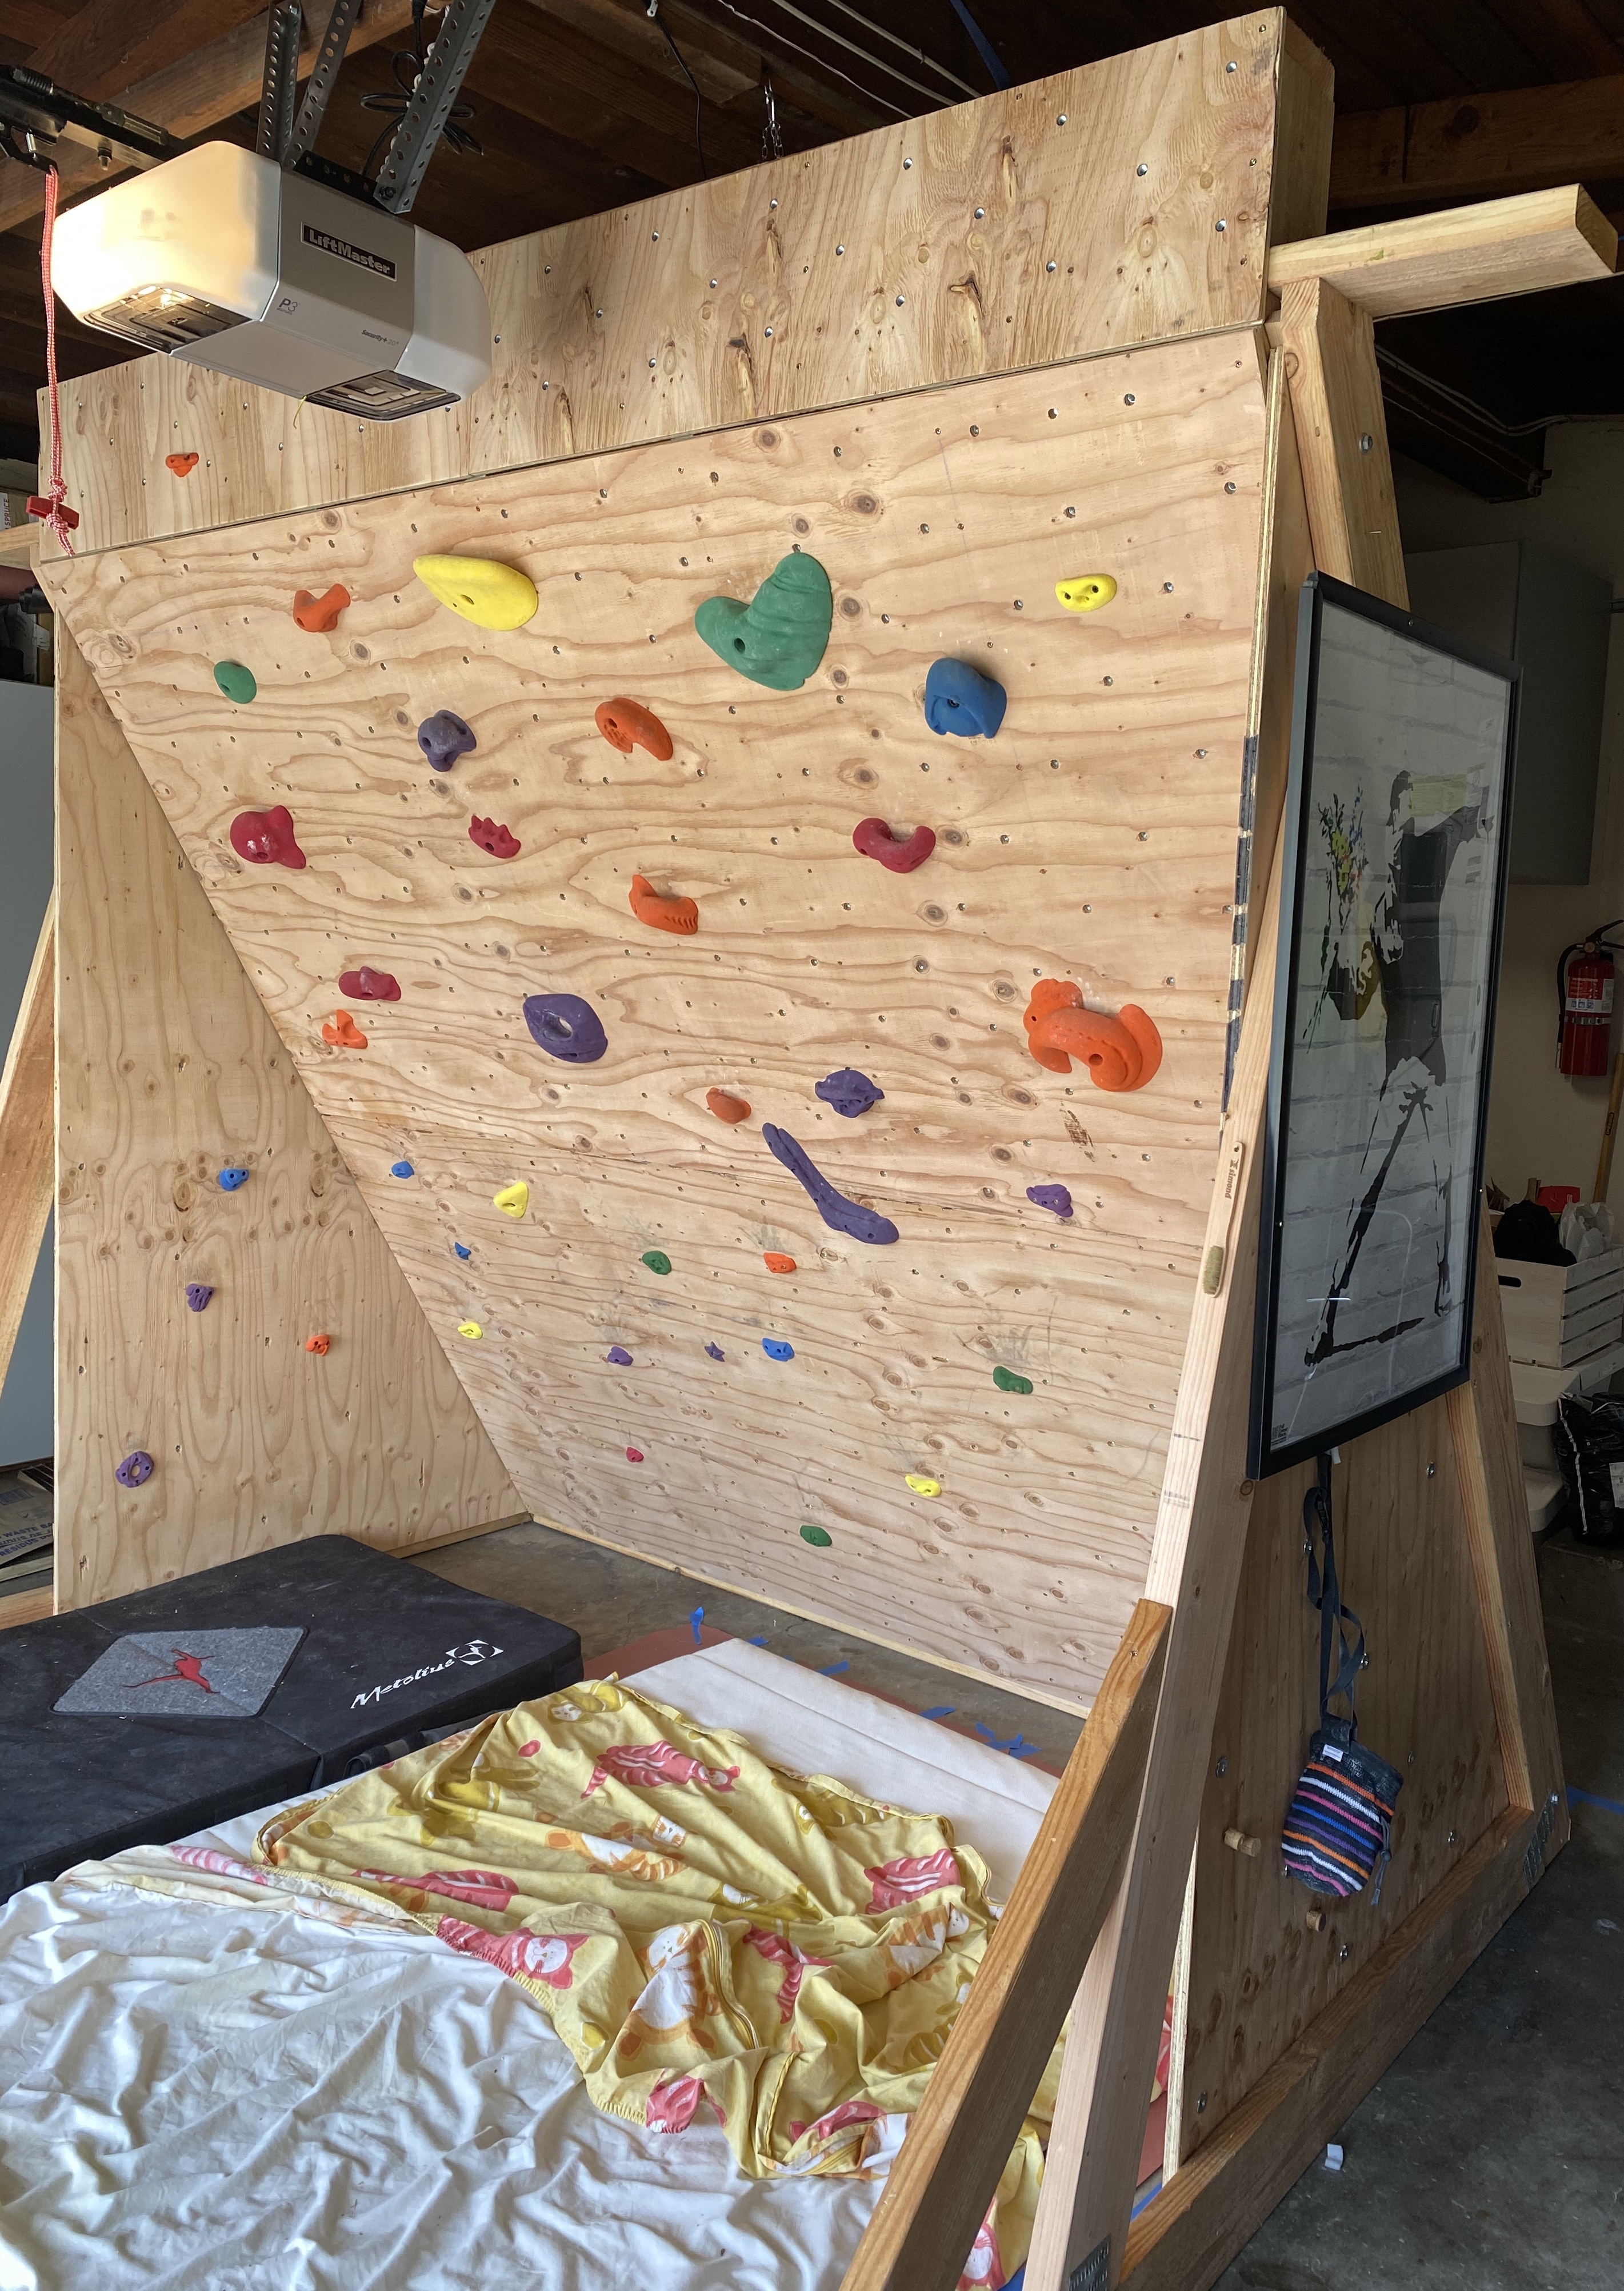
Final result
I am pretty happy with the final result. The extra effort in making the side panels was definitely worth it and has already paid dividends as the kids are able to use them to make the wall more interesting to them.
There is plenty of opportunities to reclaim some of the space lost in storage by adding shelves to the back of the wall. Stuff like scooters, skateboards have already found their new home there.

Mistakes made
I did a few mistakes when building this wall and we will see over time how this turn outs.
- I bought a cheap plywood, while it is 3/4 and is going to be rock solid, some of the ply can be soft and break easily on surface.
- I drilled 1/2 inch holes for the t-nuts. So far it does not seem to be an issue, but it is definitely looser than it should be. We will see overtime if I get a lot of spinner. Wood glue may come to the rescue to fix individual t-nuts.
Useful resources
Here is a far from exhaustive list of links I have found useful. There is a plethora of Youtube Video that came in handy to better understand how to build this.